Build a Snagging List with an Interactive PDF Floor Plan

A snag list tells you what needs fixing. An interactive floor plan shows you where. Combine both in a Softools project record so users can pin defects to their exact locations, assign the work and keep photographic evidence alongside each item.
This walkthrough builds the Willowbrook example with Document View, a linked Snagging List child app and an embedded working list. You will configure coloured priority markers, hover details, completion and archive workflows, and what happens when the plan changes.
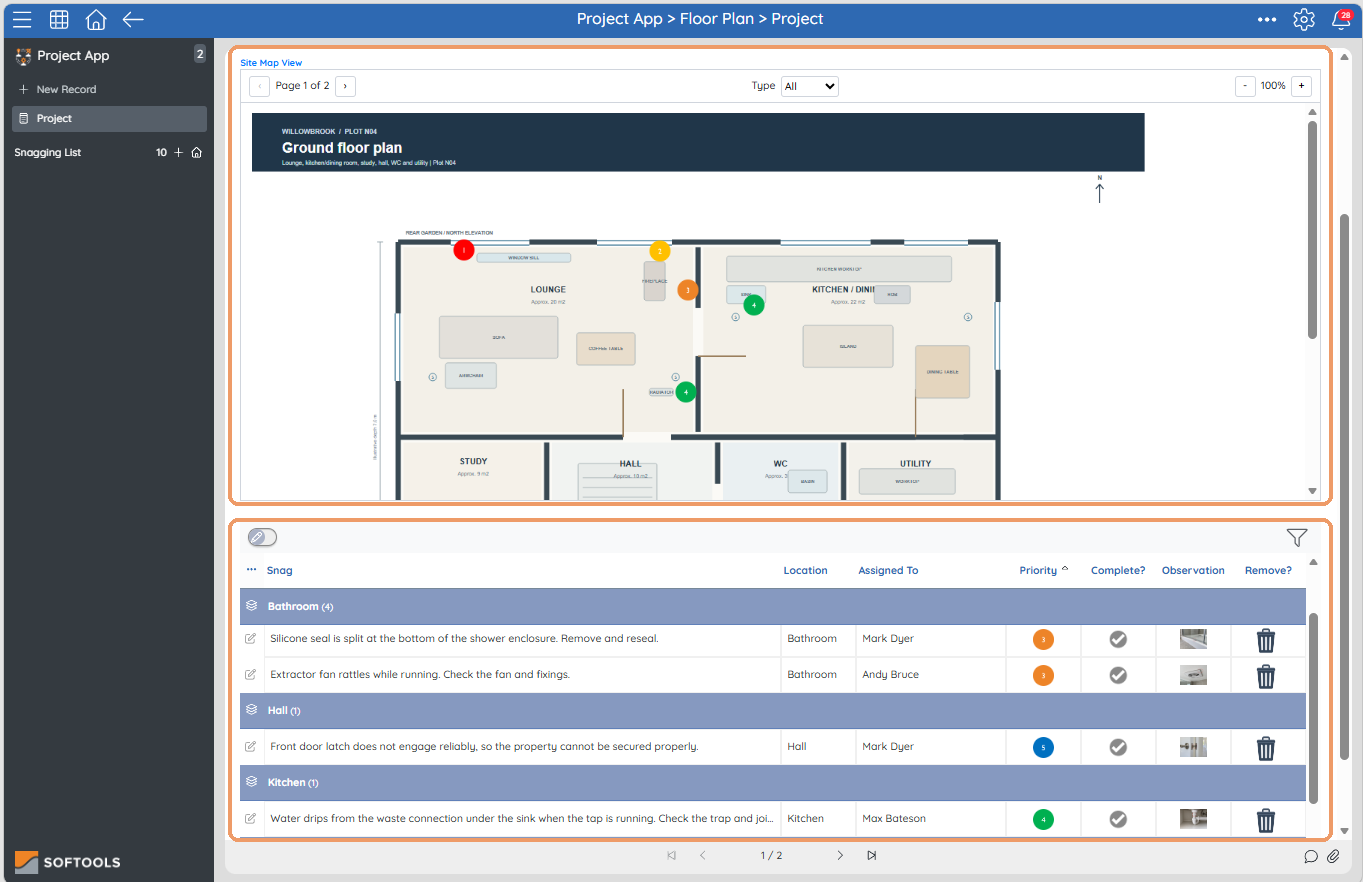
1. Display a floor plan inside the project
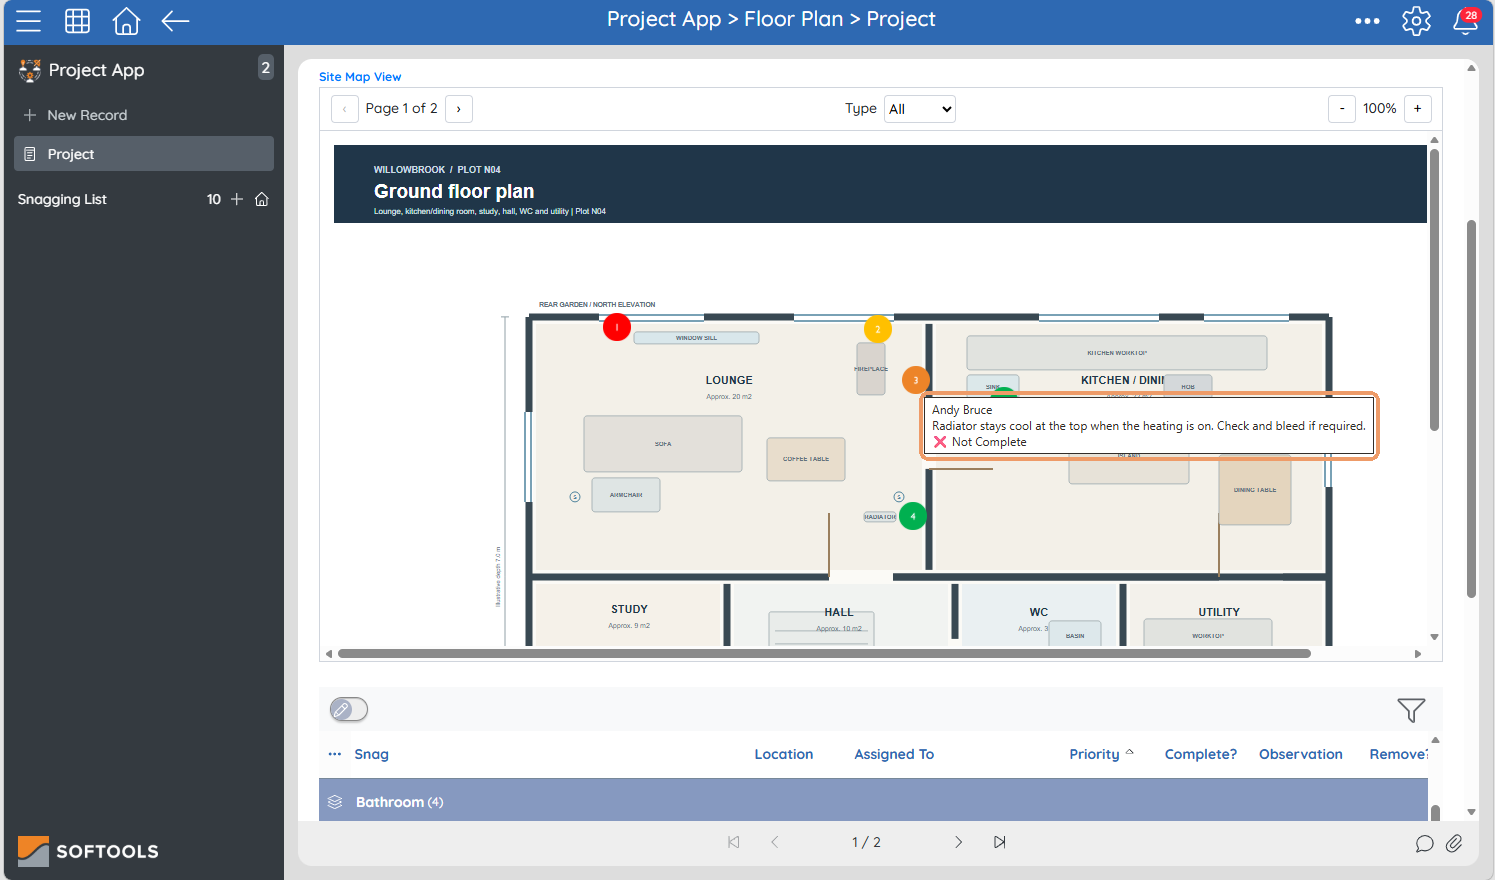
Users can move through a multi-page plan and zoom into detailed areas without leaving the project record.
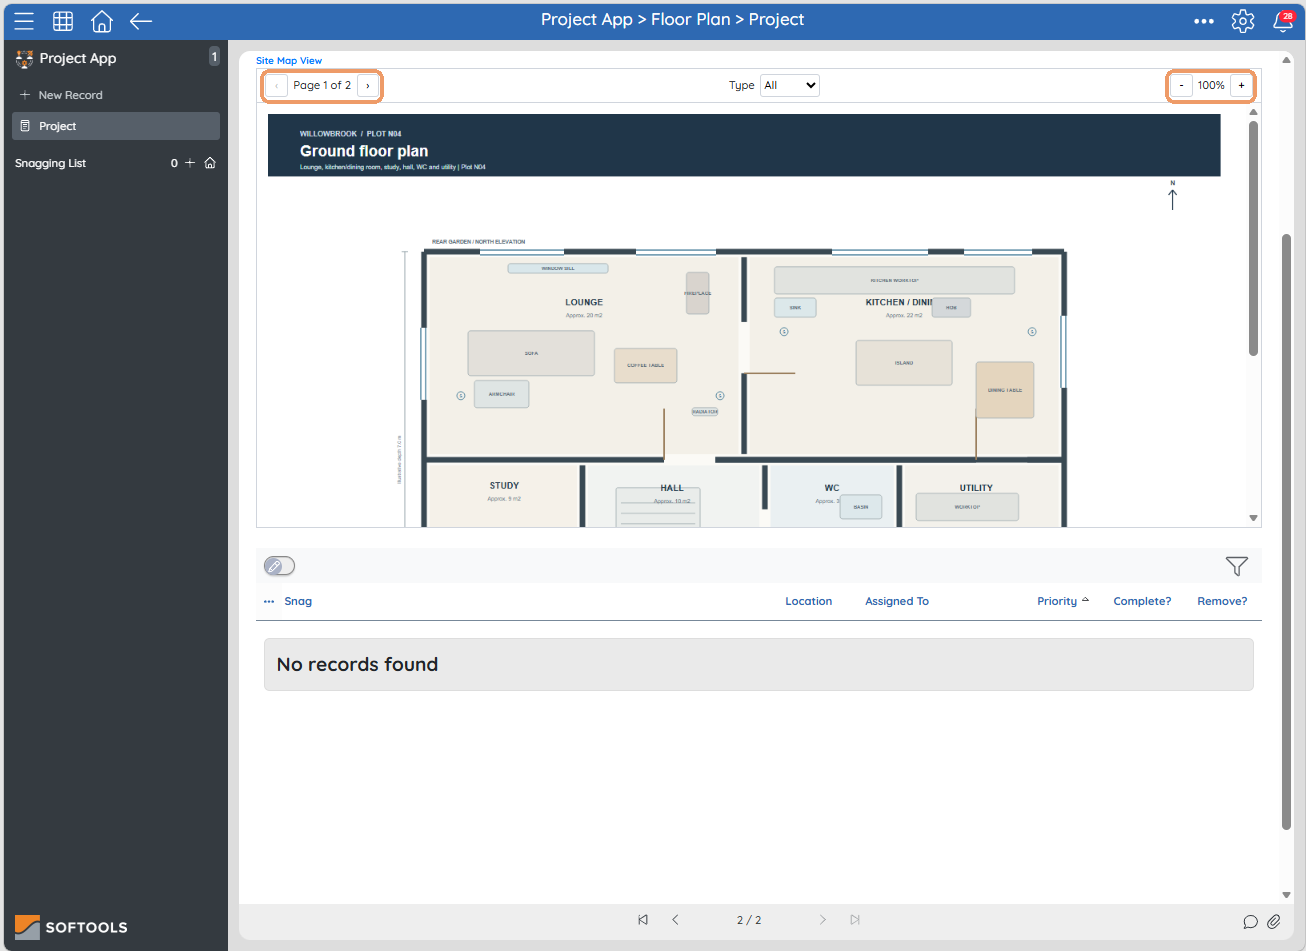
Build it
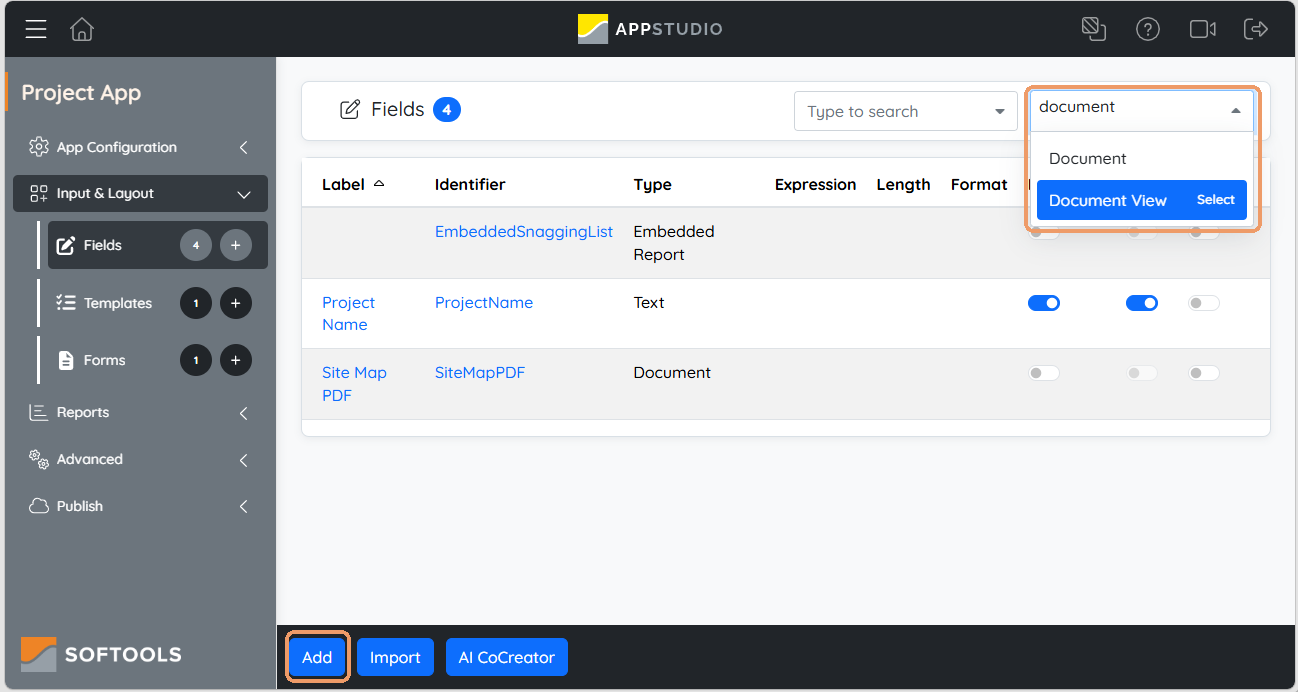
Create Project App with a Project Name Text field and a Site Map PDF Document field. In Input & Layout > Fields, find Document View in the field-type selector, select it and use Add. Name the field Site Map View.
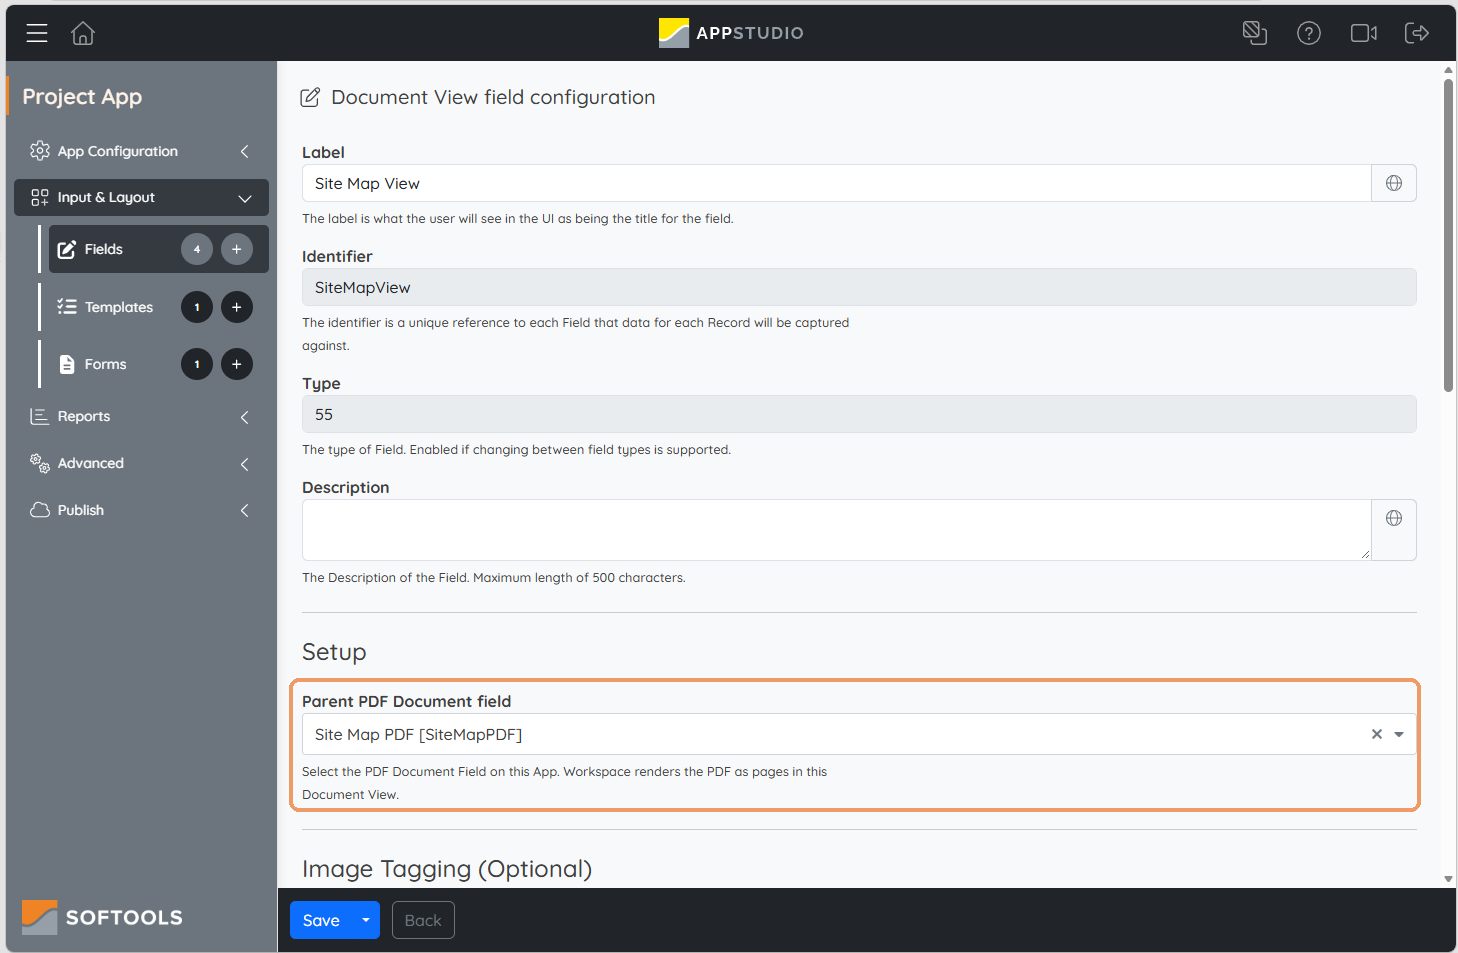
Select Site Map PDF as the viewer’s Parent PDF Document field. Place both fields on the parent template used by the form. After publishing, upload the floor-plan PDF to the parent record’s Document field in Workspace.
2. Click a location to create a snag
Click the window-sill defect on the PDF. The create template opens at that position; the viewer supplies the page, coordinates, document version and parent link.
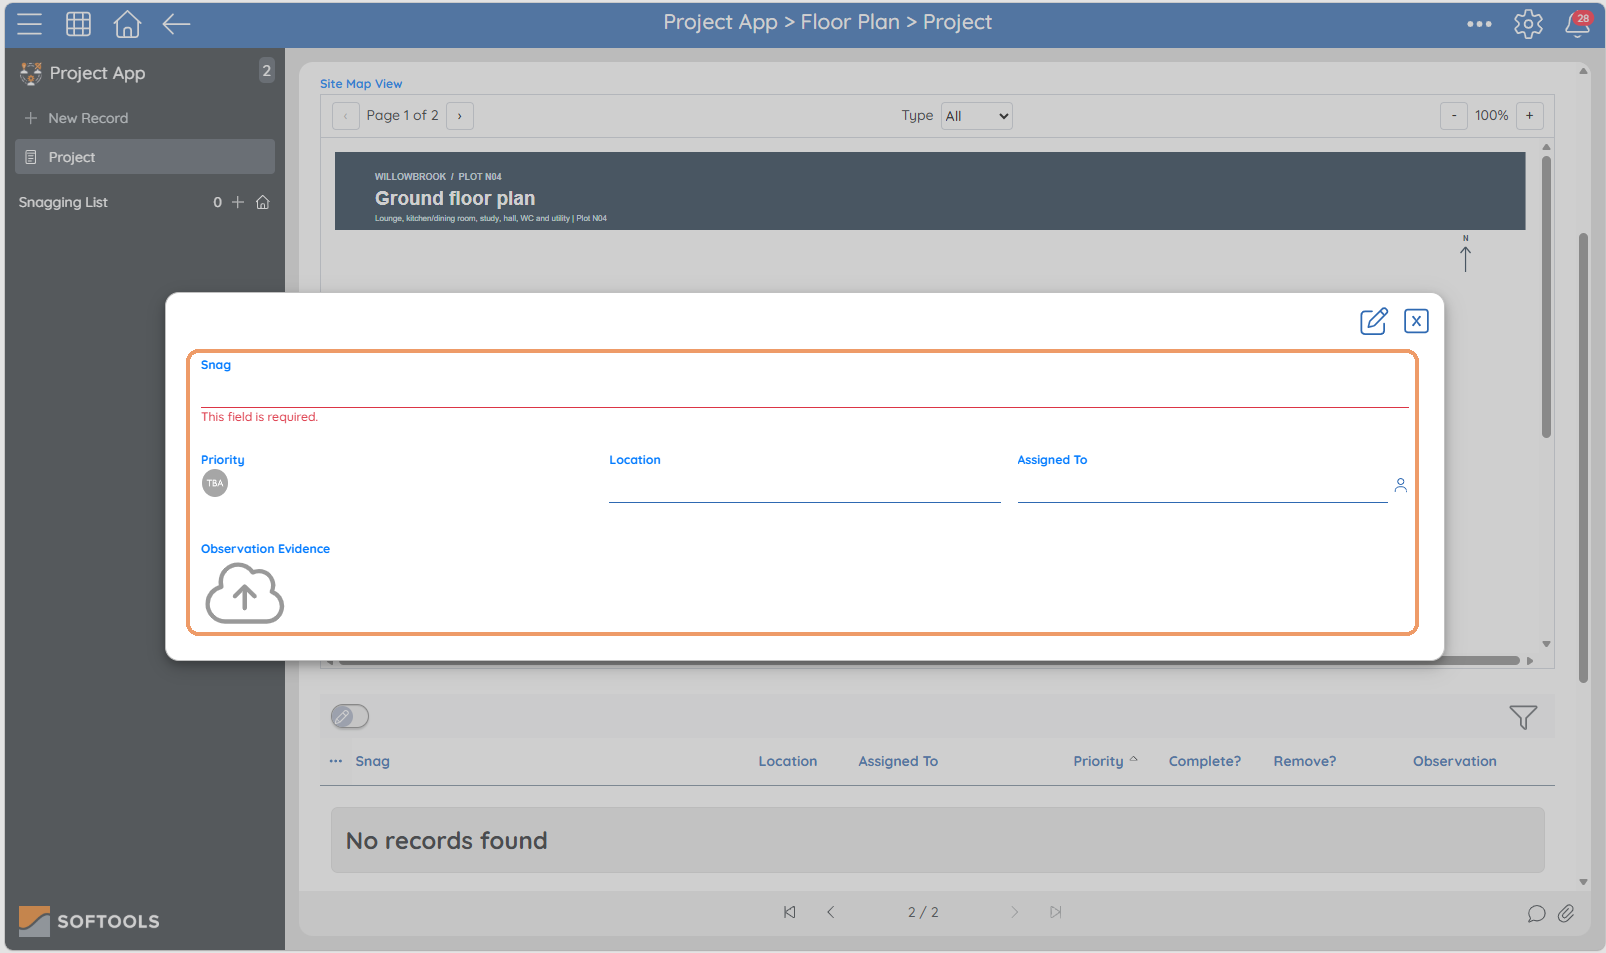
Enter Small paint mark on the window sill. Touch up the finish. Select Red priority, enter Lounge and assign Andy Bruce. Add a photograph through Observation Evidence.
Enter all required fields to create the snag. There is no separate Save button; any other configured field validation must also be satisfied.
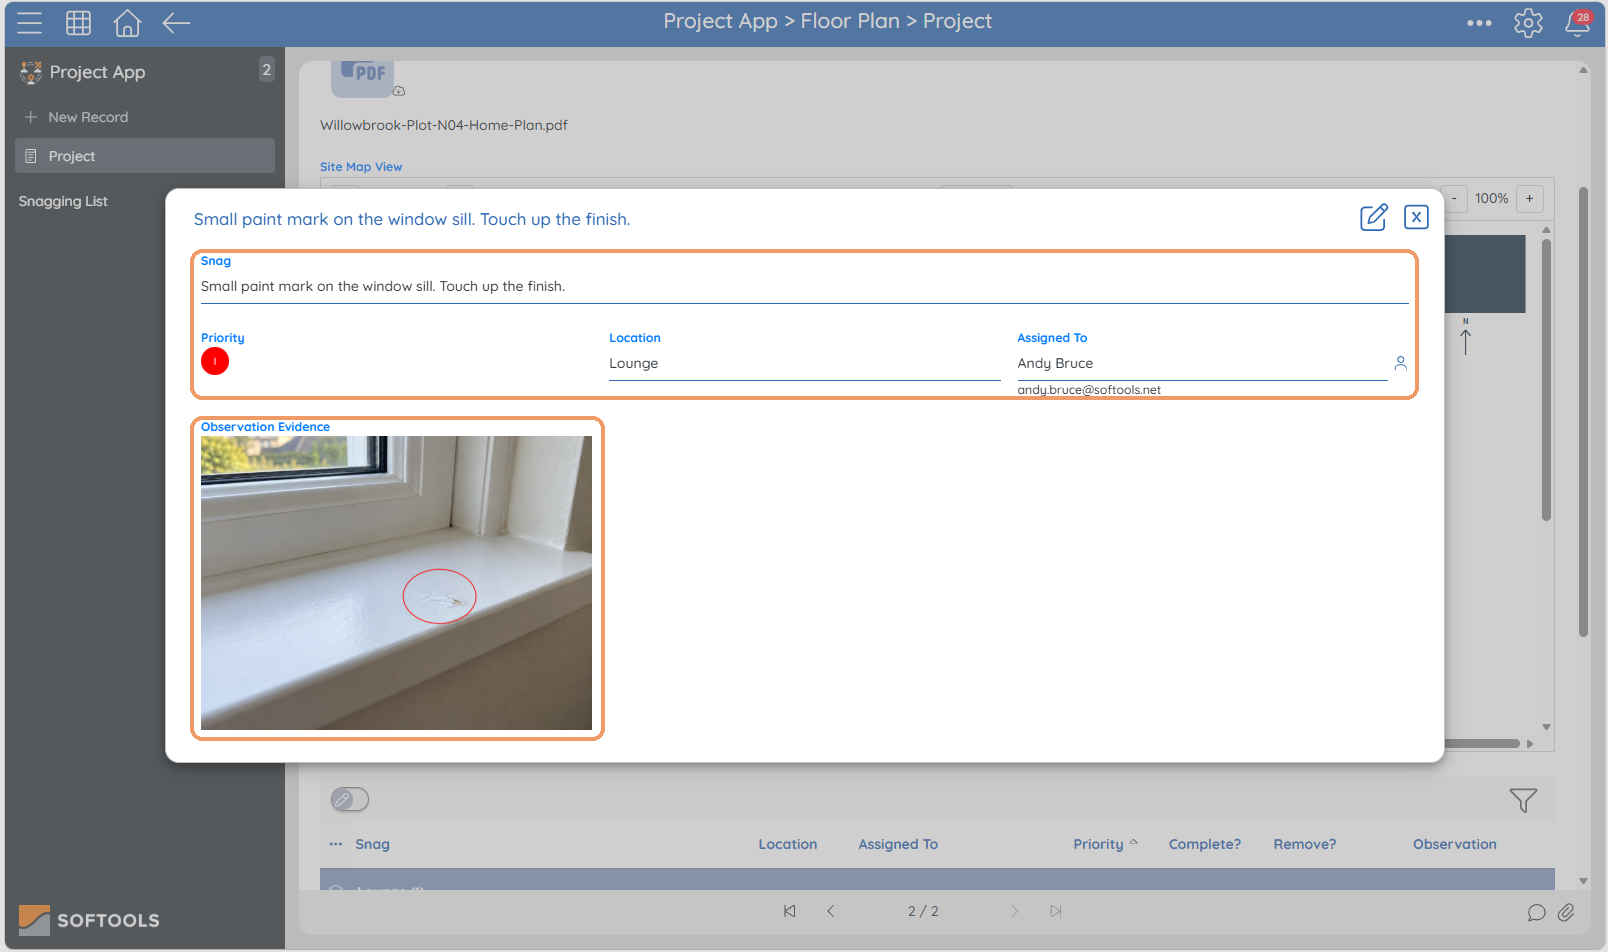
Build it: connect the child app
In the child Snagging List app, create Snag (Text), Location (Text), Assigned To (Person), Priority (Image List), Observation Evidence (Image), Complete? (Image List) and Remove? (Action). Make Snag required for the example.
In Project App, open Advanced > Integrate and add Snagging List as a child app. Save the integration. The Document View can then select that child app, and new markers will create records linked to the project they were added from.
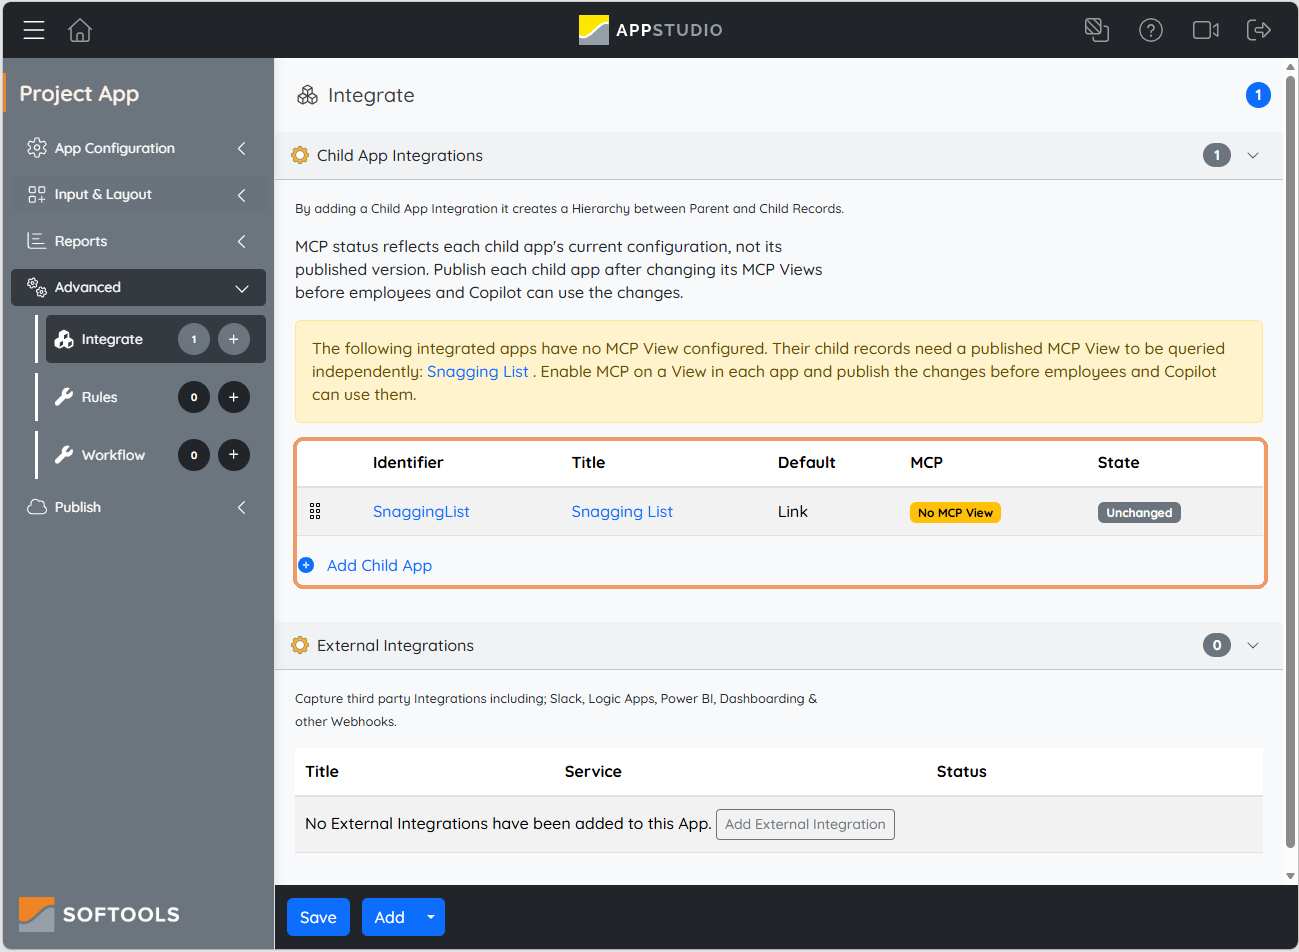
Generate and map the position fields
In the viewer’s Image Tagging (Optional) configuration, select Snagging List and use Generate missing fields. It creates missing marker fields and automatically populates the four mapping selections. Review them, save and publish the child app.
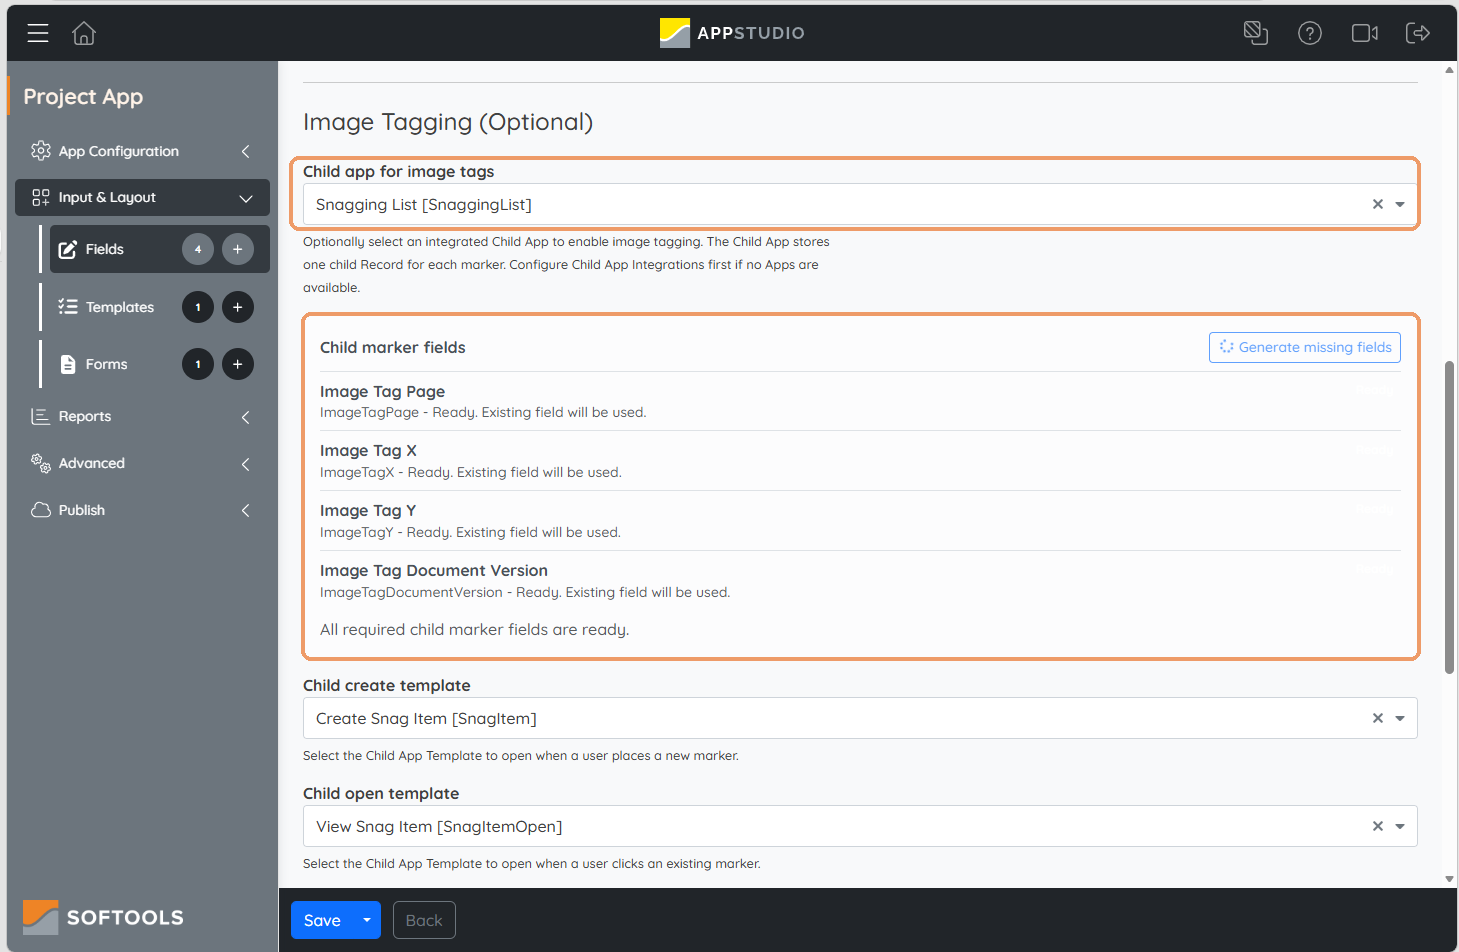
The mappings are ImageTagPage (Integer) for Page, ImageTagX and ImageTagY (Number) for normalised positions from 0 to 1, and ImageTagDocumentVersion (Text) for Document asset/version. The viewer fills these values when a marker is placed.
Configure the create and open templates
Create two templates in the child app. Create Snag Item contains Snag, Priority, Location, Assigned To and Observation Evidence. View Snag Item contains those fields plus Complete? and Remove?. Select them as the viewer’s Child create template and Child open template.
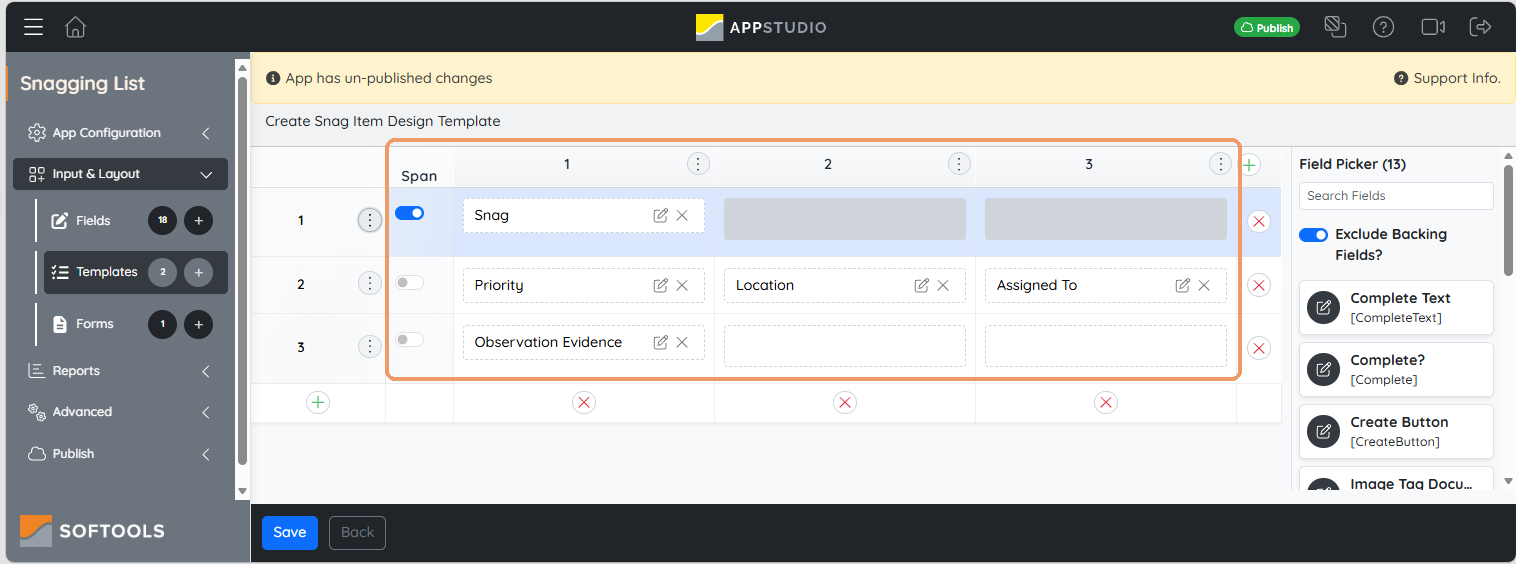
Use the open template to add the completion and removal controls for existing snags.
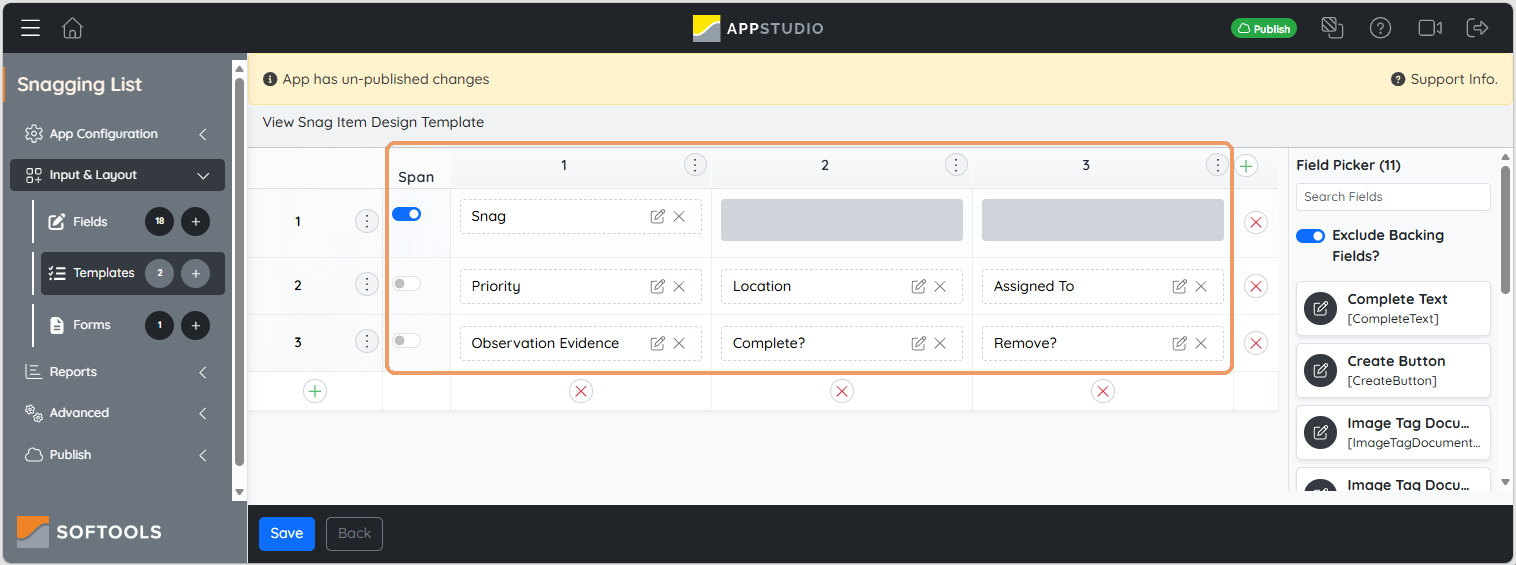
Leave the marker fields and workflow backup fields off these templates. App Builders can inspect their values while developing the solution, but users only need the snag details and actions. Clicking an existing marker opens the configured open template. There is currently no direct marker-position editing control.
3. Understand outstanding work at a glance
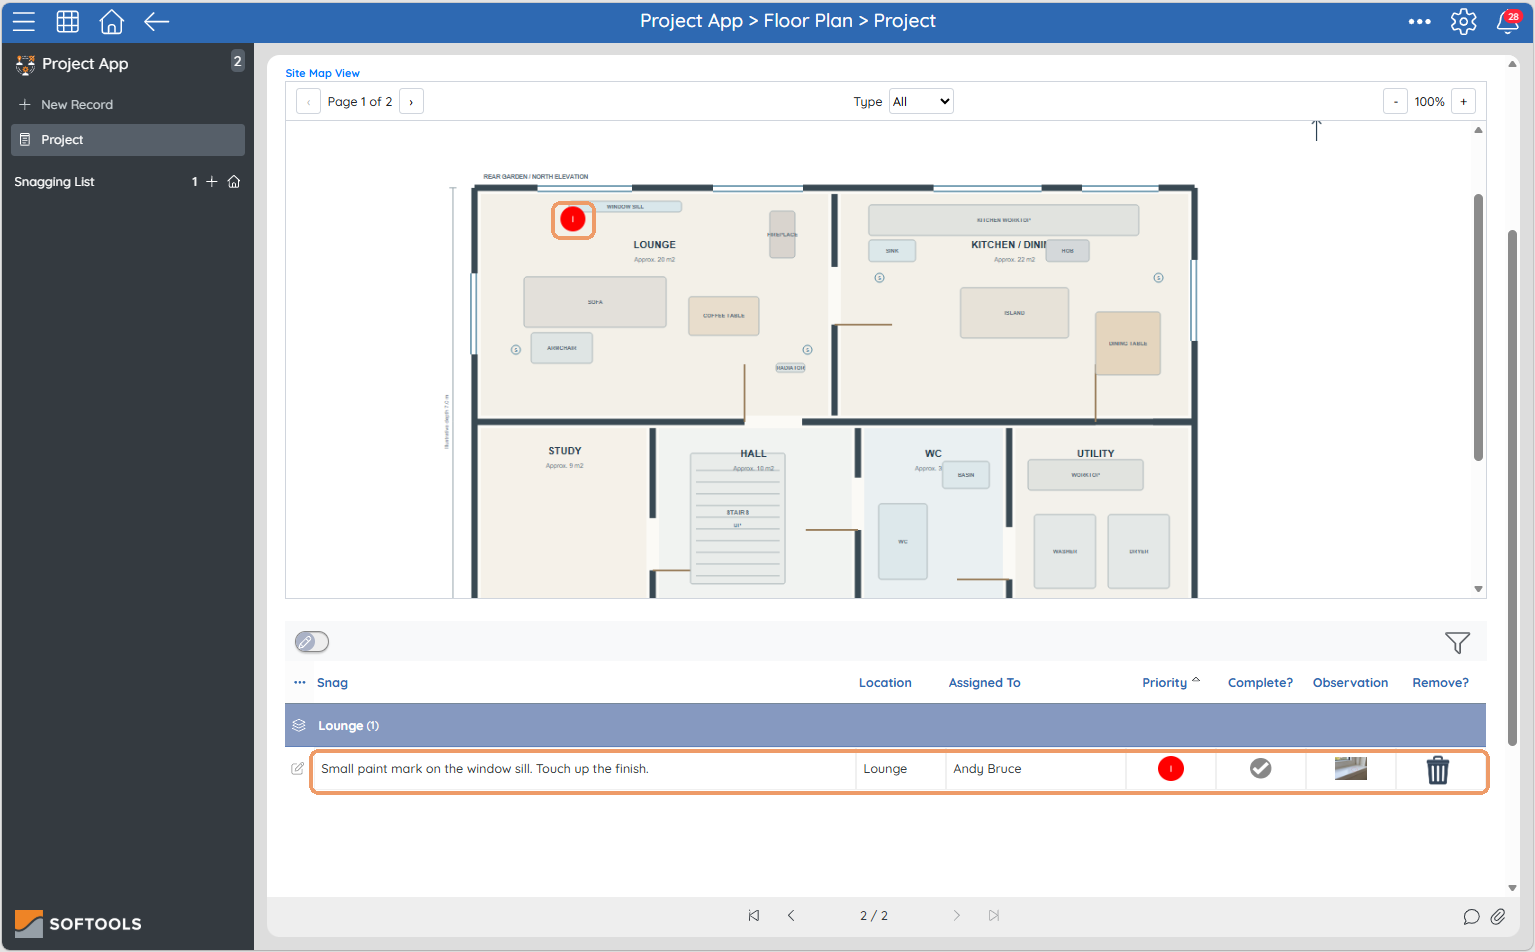
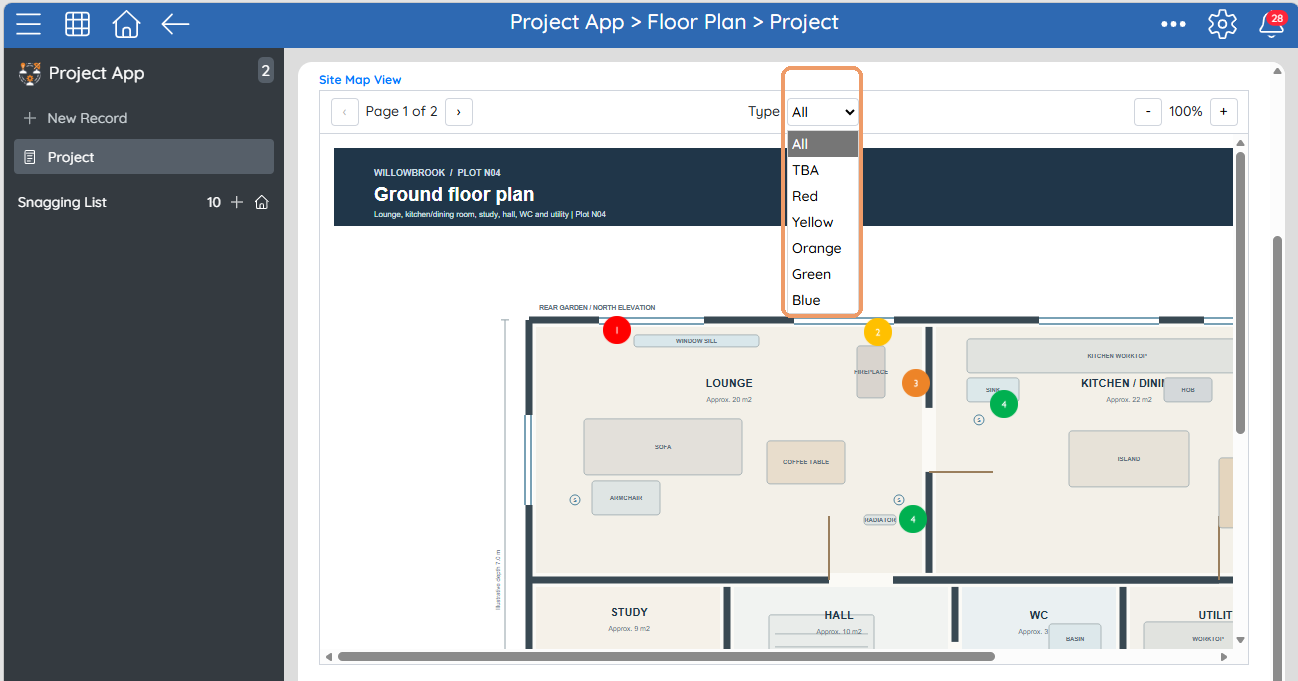
The selected Priority image becomes the whole marker. Its number belongs to the Image List option, so it is not a unique snag number. Use Type to focus on one priority category; it filters the markers only and leaves the separate report unchanged.
Hover over a marker to see its assignee, description and readable completion status without opening it.
Build it: marker images and tooltip text
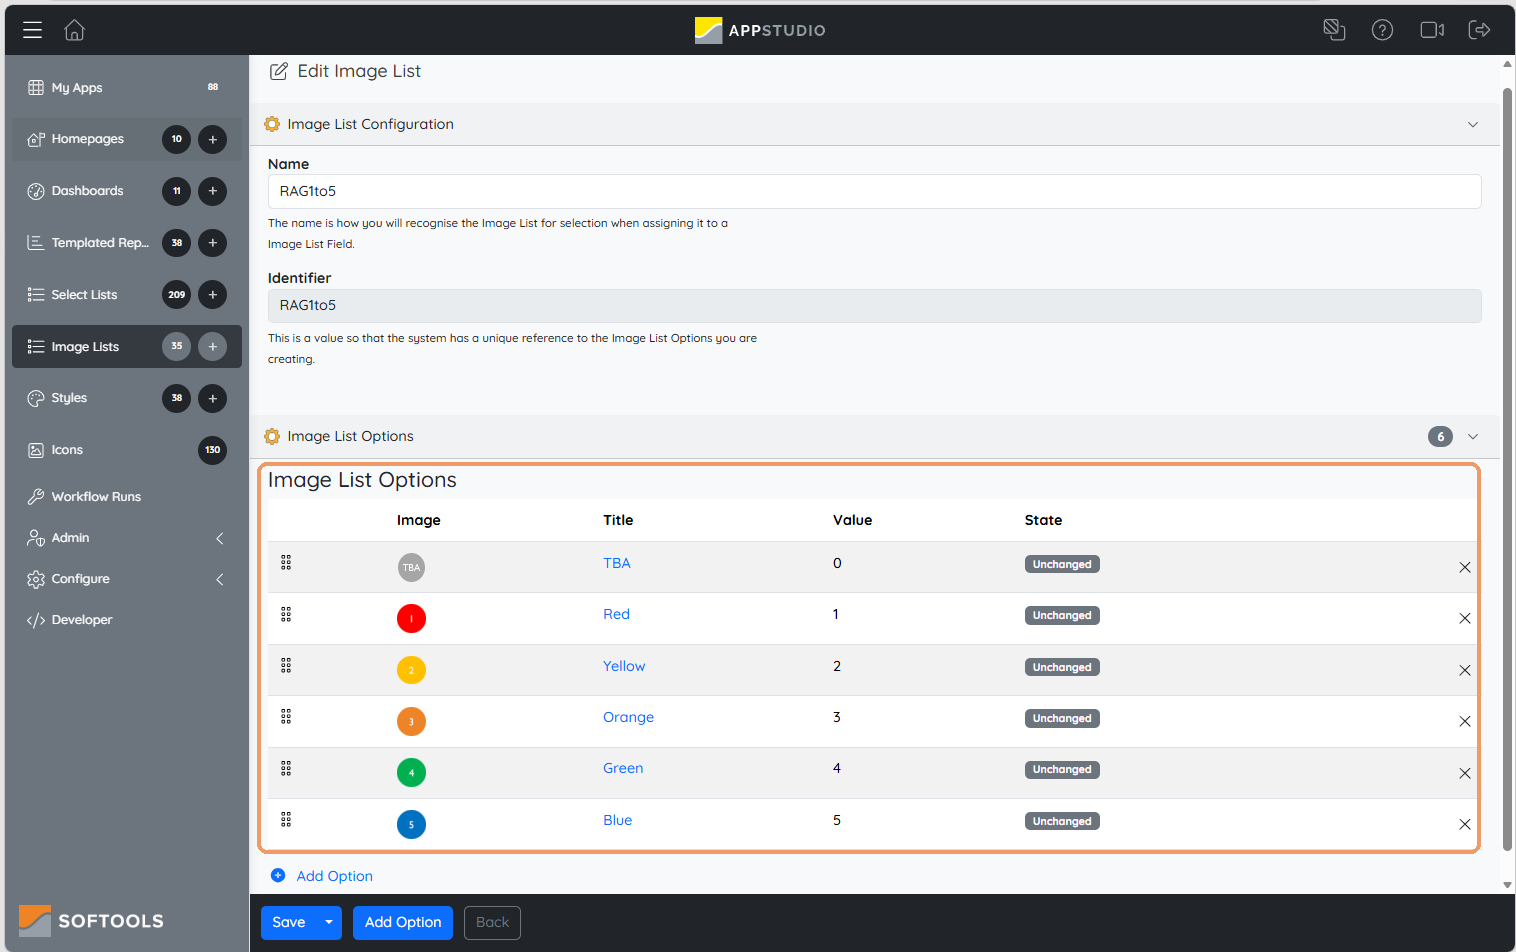
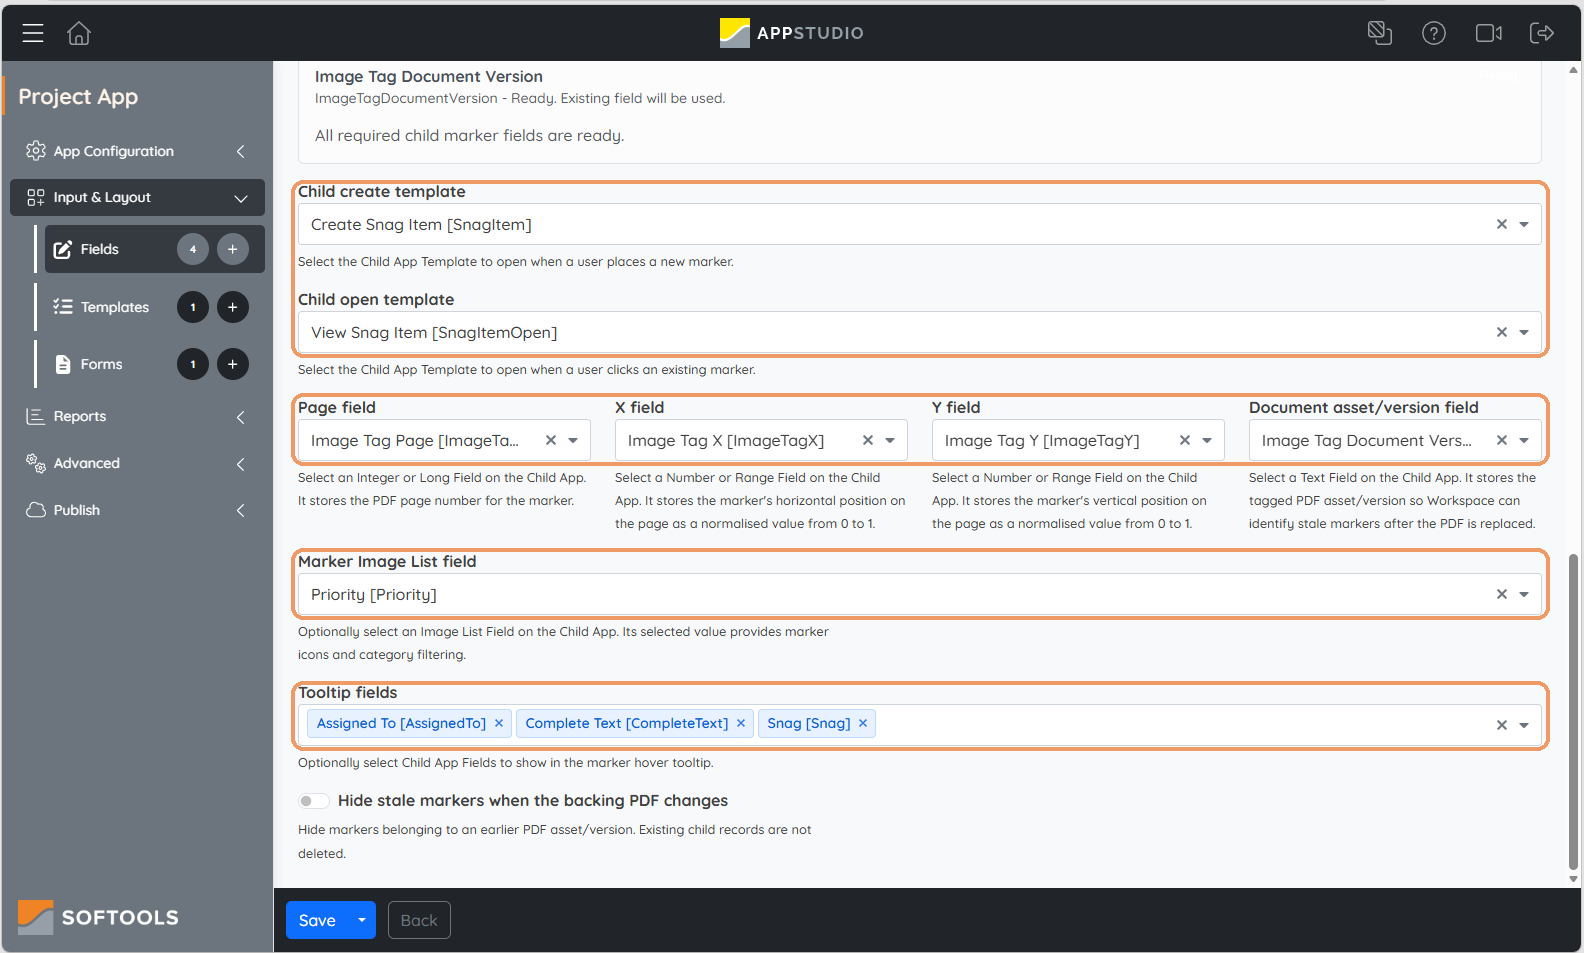
Select Priority as the Marker Image List field. This is required for image tagging. The selected image-list option supplies the entire marker image. In this example, the images are coloured circles containing a priority number, with a grey TBA option.
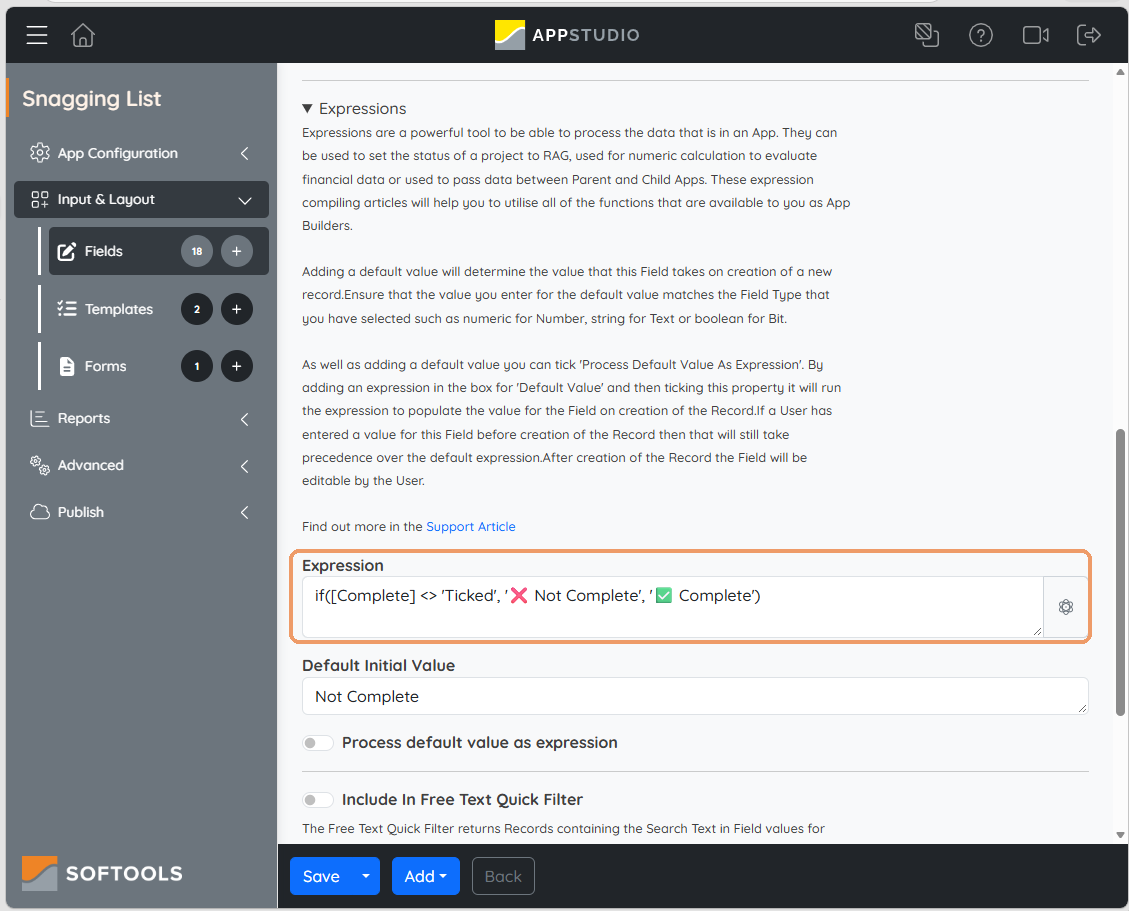
Create a Text field in Snagging List with label Complete Text and identifier CompleteText. Set its expression to:
if([Complete] <> 'Ticked', '❌ Not Complete', '✅ Complete')Then select Assigned To, Complete Text and Snag under the viewer’s Tooltip fields.
You can also prepare text values such as “Assignee: Andy Bruce”. The label makes the person’s role clear: a name alone could mean the person responsible for the action or the person who raised it.
4. Open and manage a snag from the plan or list
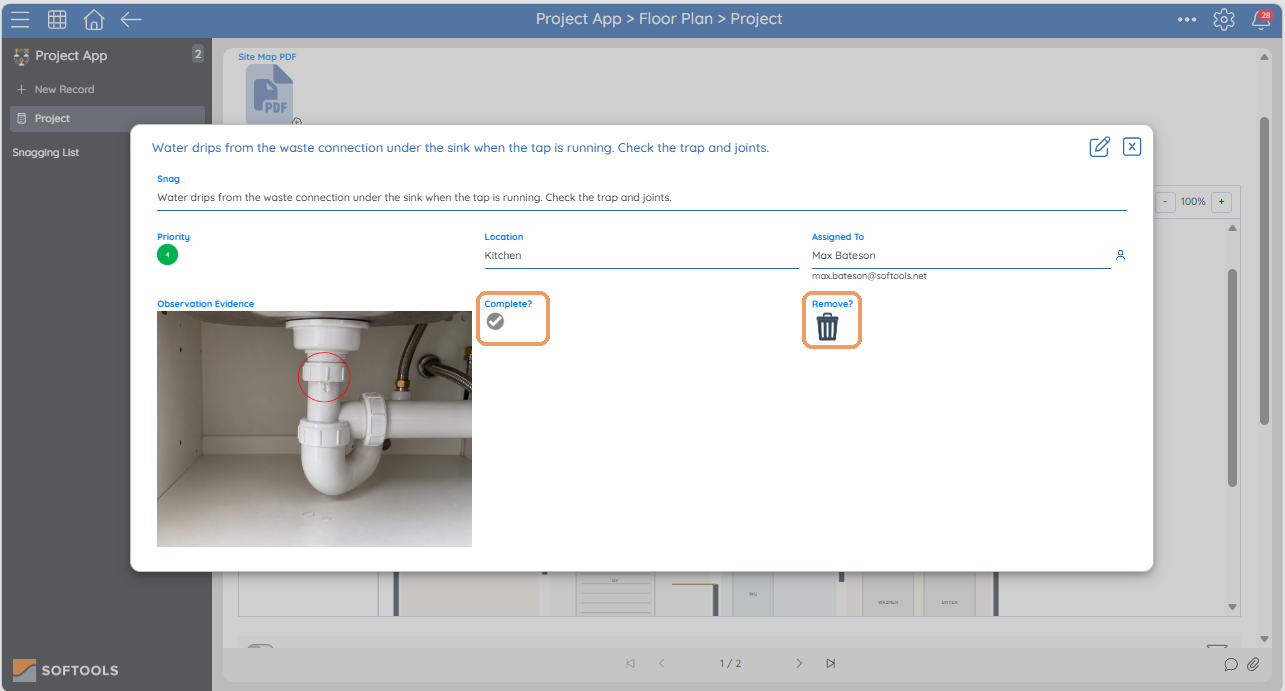
Clicking a marker opens View Snag Item, where users can update the record, inspect evidence and use Complete? or Remove?. The viewer updates automatically as records change. Users only see markers for child records they can access; read-only users can open the pop-up to view details.
The Kitchen snag below shows the open template with its evidence, completion control and Remove? action.
The embedded list provides another route to the same records and remains useful when a completed marker has been hidden.
Build it: add the working list
Add a separate Embedded Report field to Project App. Select Snagging List as both the embedded app and report, choose a height, and place the field below the Document View on the parent template.
Configure the child report with Snag, Location, Assigned To, Priority, Complete?, Observation Evidence and Remove?. Group by Location to organise work by room. The hierarchy automatically restricts the embedded report to the current project’s child records. Base filters on the selected report also apply; this demo uses none.
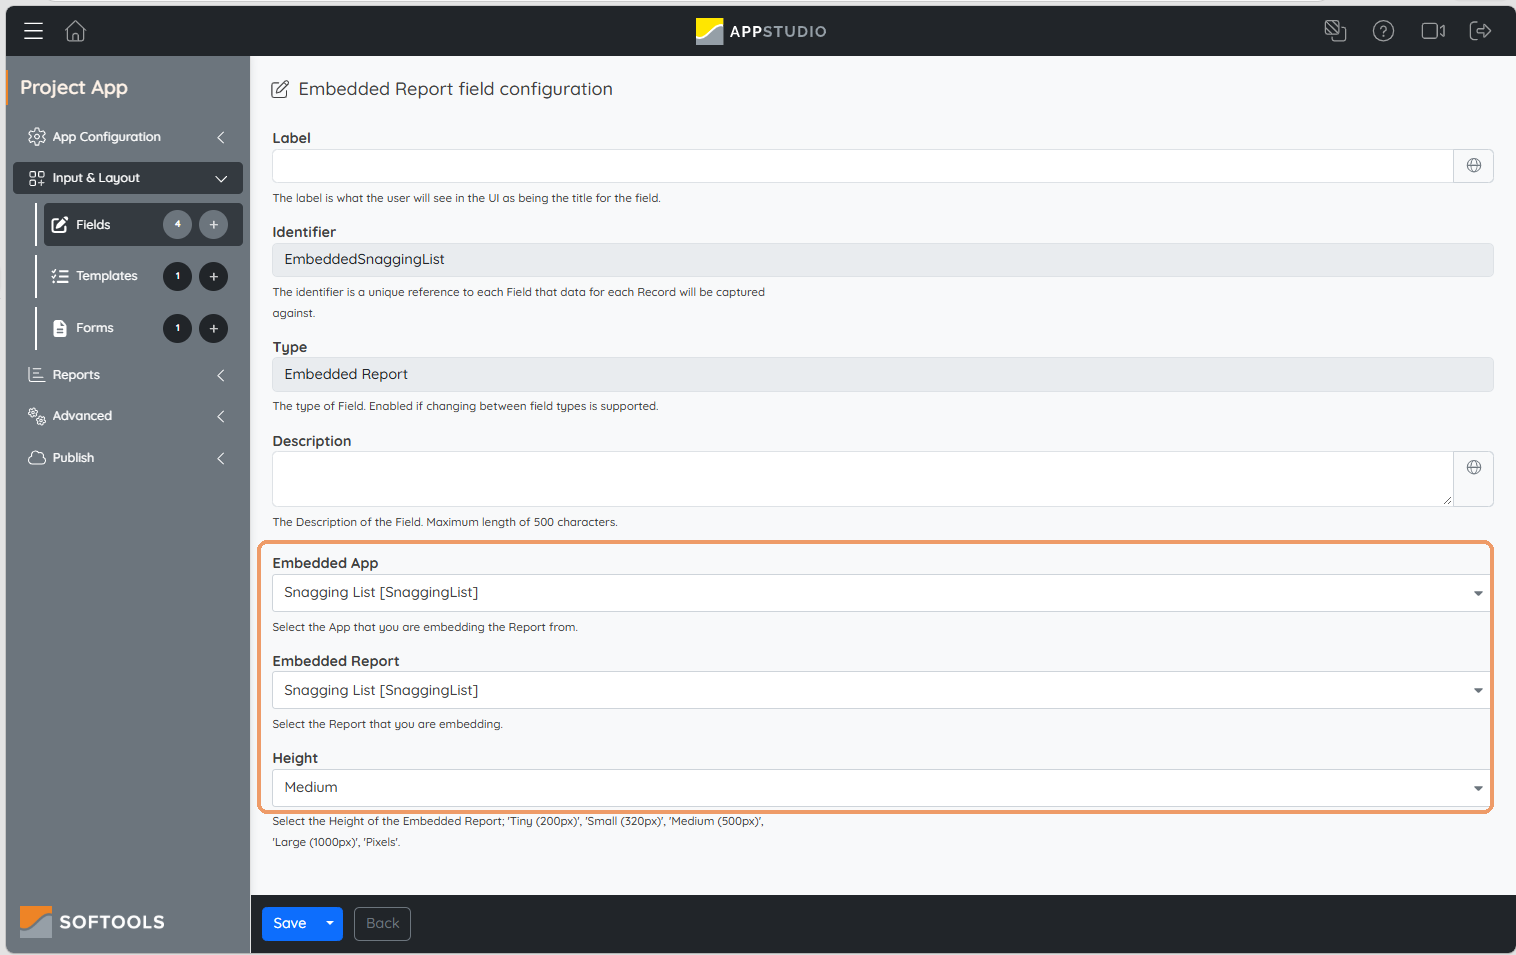
This gives users both a visual location and a structured working list. A record can remain in that list even when a completion workflow hides its marker from the plan.
5. Complete work and bring it back when reopened
When the configured workflow runs after Complete? is ticked, the marker disappears automatically and the report row remains with a green completion image. The record and its evidence are retained.
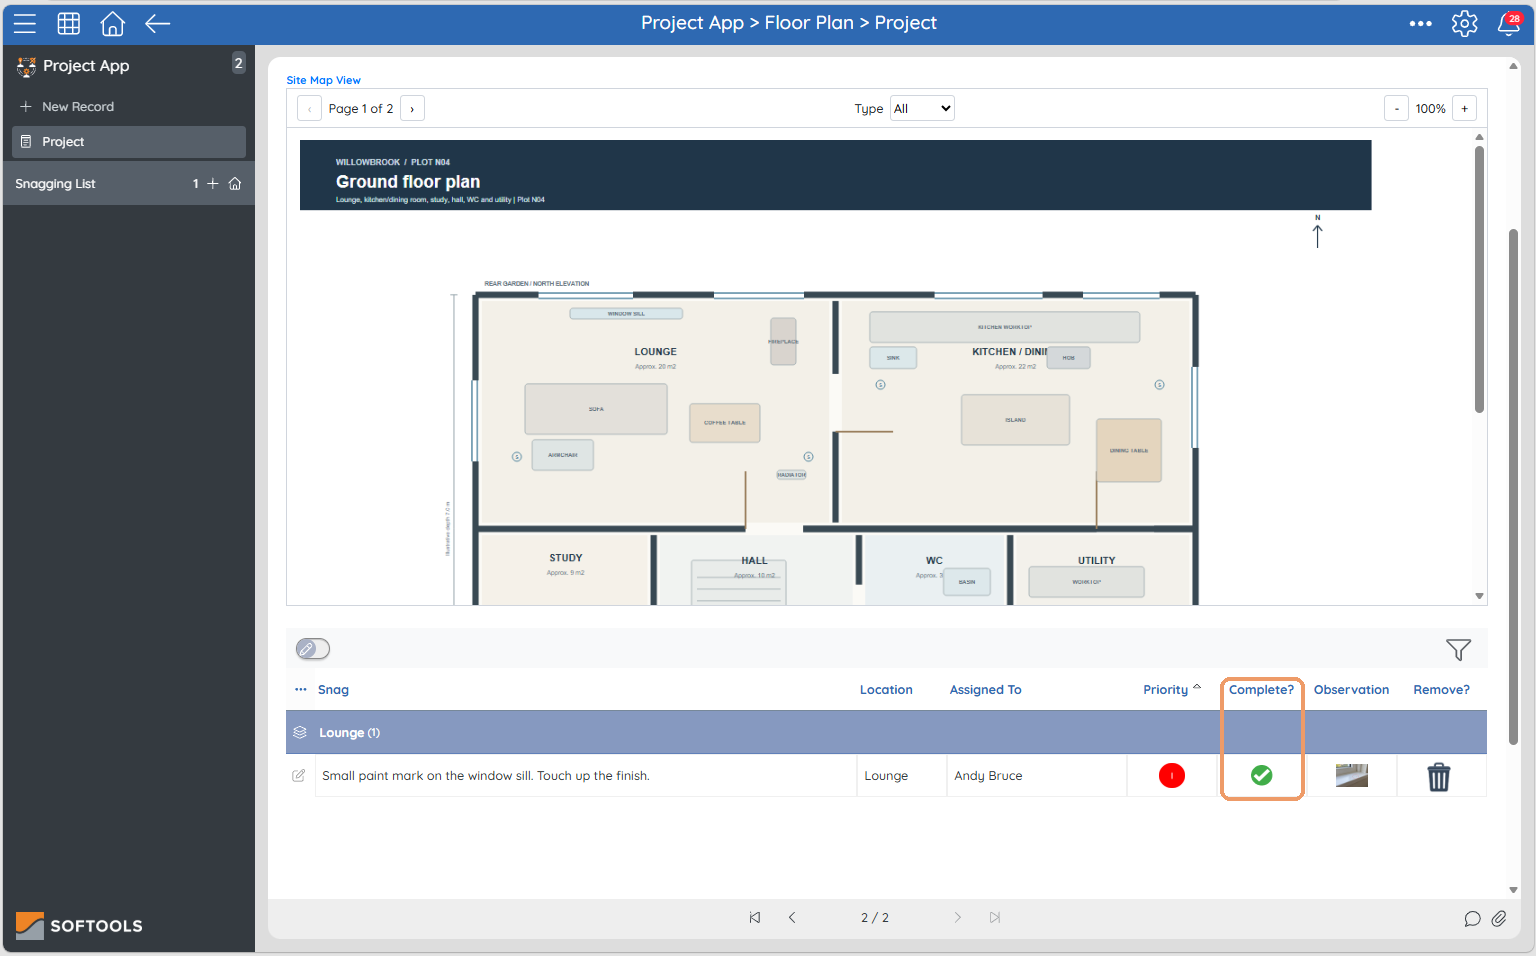
To reopen work, open the record from the report and set Complete? to Not Ticked. The workflow restores its marker values and the viewer updates automatically, subject to document-version matching.
Build it: configure Complete?
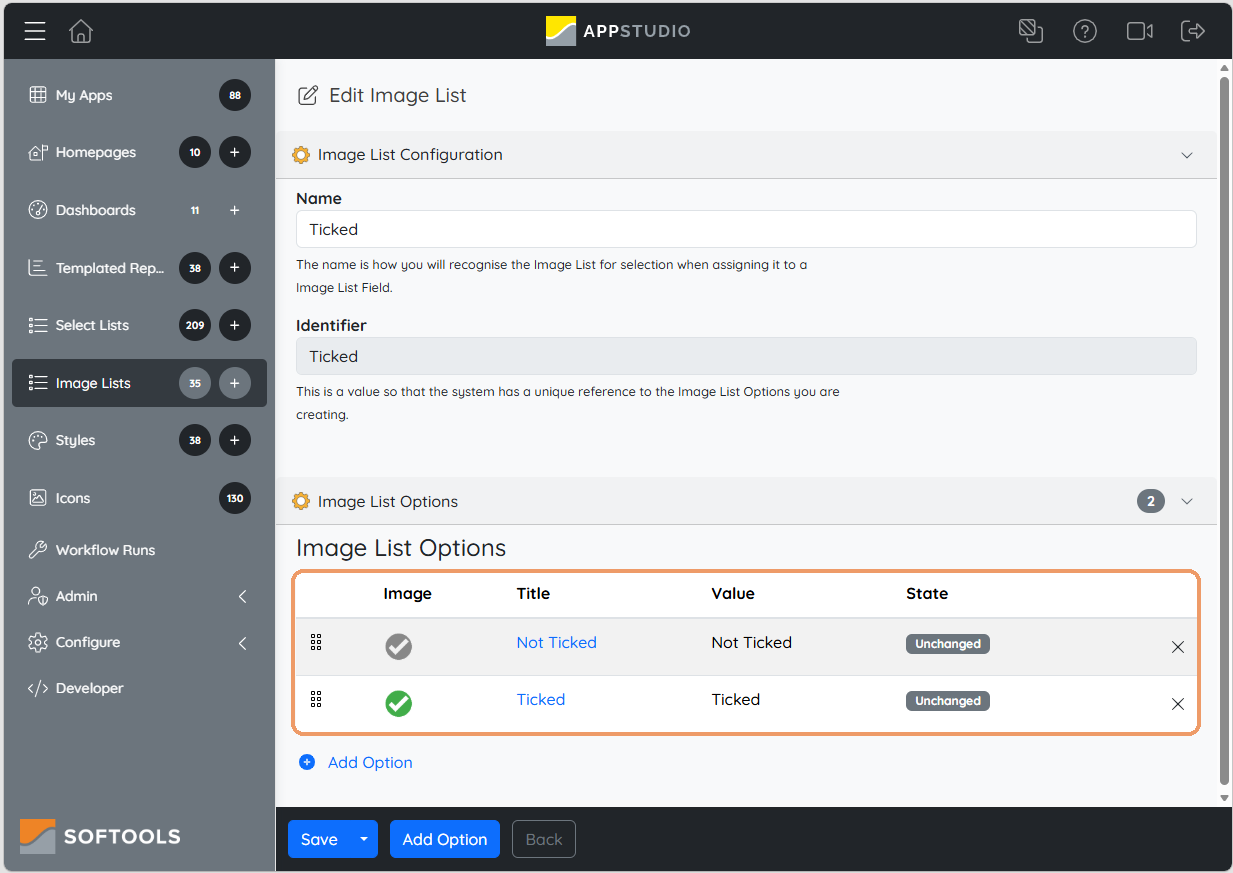
Create an Image List field with label Complete? and identifier Complete. Select the Ticked Image List. Its grey option has title and stored value Not Ticked; its green option has title and stored value Ticked. The workflow and tooltip expression compare the stored value Ticked, so preserve that spelling or update the expressions to match your chosen values.
For this build, use Not Ticked as the initial value. The workflow conditions below treat any value other than Ticked as not complete.
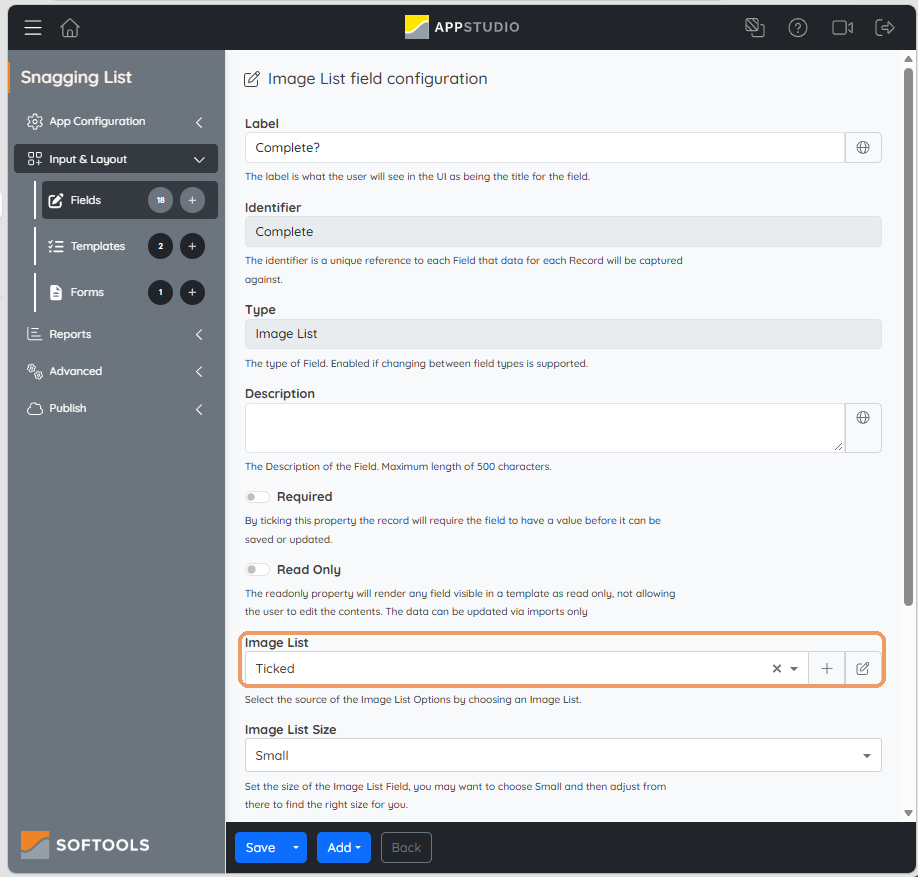
The source Image List must store Not Ticked and Ticked, matching the expressions used below.
Add backup fields and the workflow
Create four backup fields: ImageTagDocumentVersionComplete (Text), ImageTagPageComplete (Integer), ImageTagXComplete and ImageTagYComplete (Number).
Add a Field updated trigger with two filter branches. The combination responds when the field in the filter changes and the condition is met.
For [Complete] = 'Ticked', use an Update field value node to copy all four live marker values into their backup fields. For example, ImageTagPageComplete receives [ImageTagPage]. A second node clears the live document version to '' and sets live Page, X and Y to 0. The marker disappears while the child record remains in the report.
For [Complete] <> 'Ticked', copy all four backup values back into the live fields. Then clear the backup version to '' and backup Page, X and Y to 0. The marker returns, subject to the PDF-version setting described below.
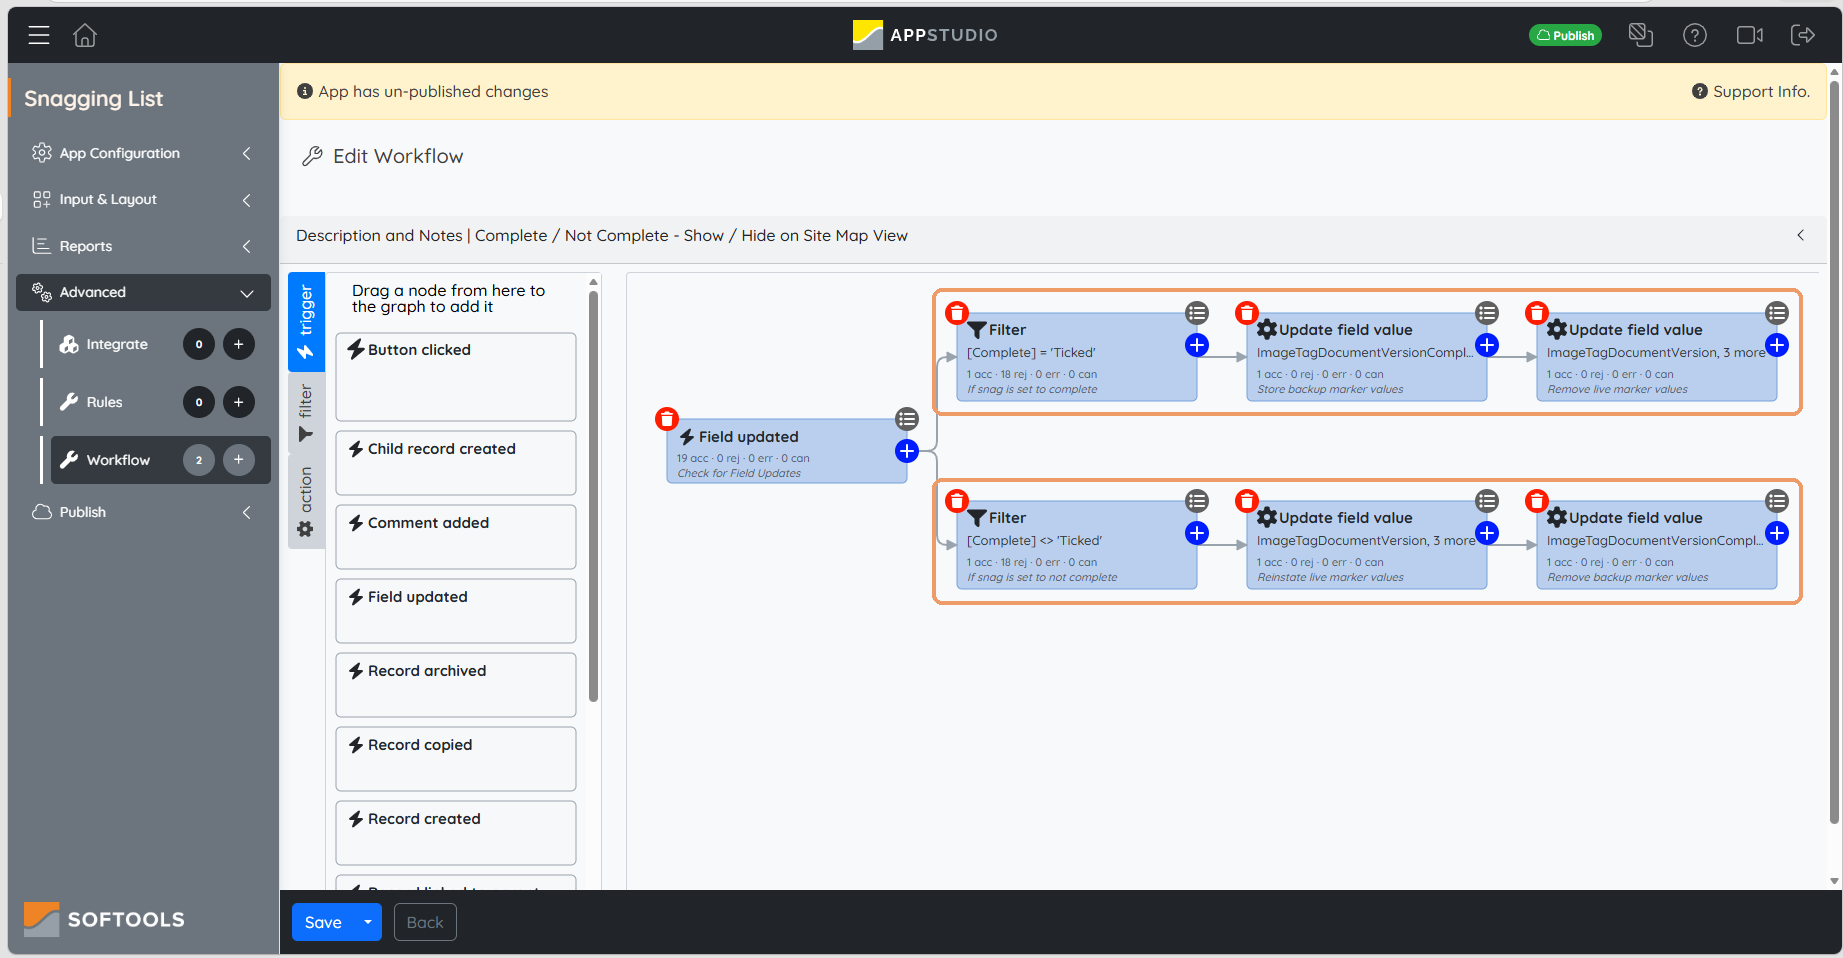
Enable Use rolling updates and Pass updated values to following workflow actions on the update nodes, as in this example. Clearing the backup values matters: a node that makes no value changes does not continue to subsequent actions. Old backup values could otherwise prevent a later completion cycle from reaching the step that clears the live marker values.
See the workflow moving the marker values
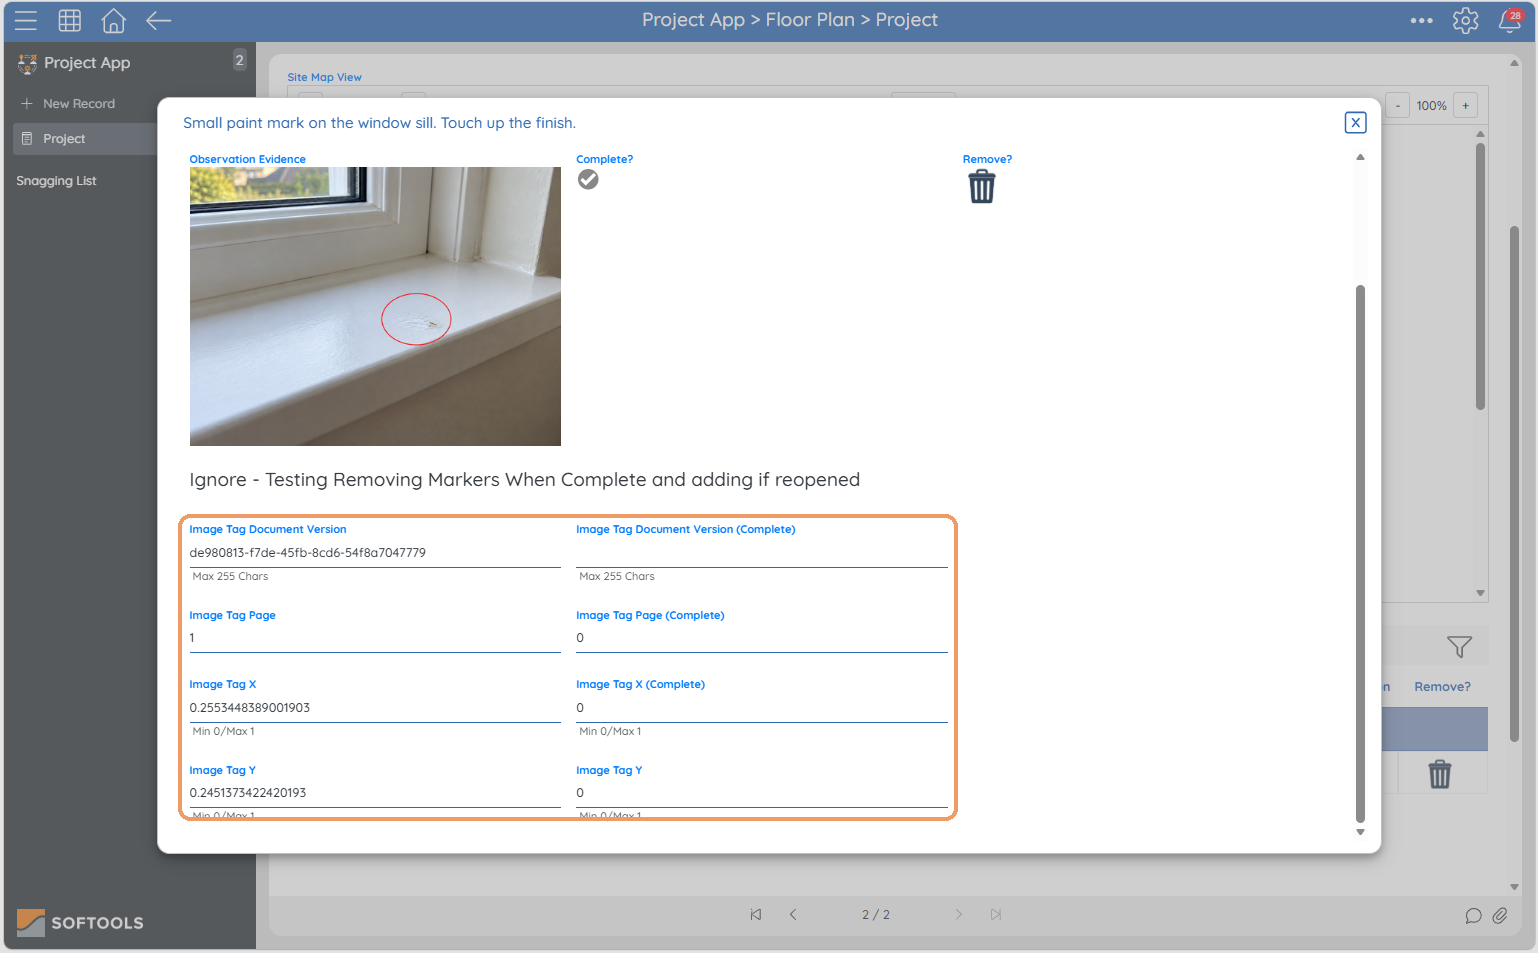
These diagnostic views expose internal fields so App Builders can follow the workflow. Leave these fields off normal user templates.
Before completion, the live fields contain the page, X, Y and document version. The backup fields are empty or zero.
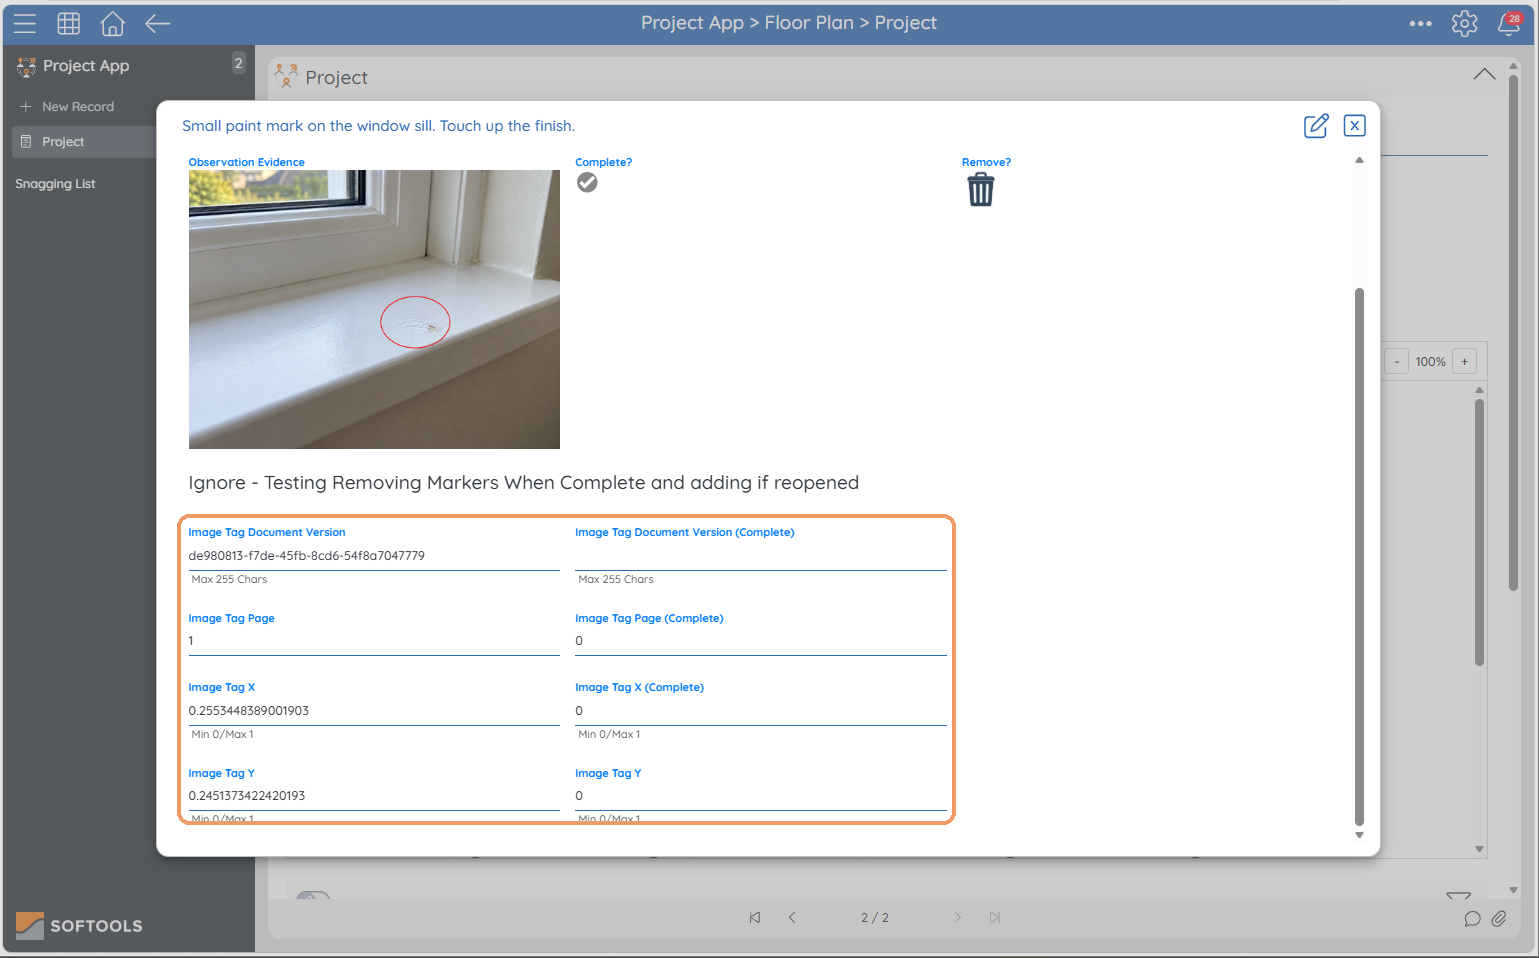
After completion, the live version is blank and the live page and coordinates are zero. The backup fields hold the original values, preserving the marker position while it is hidden.
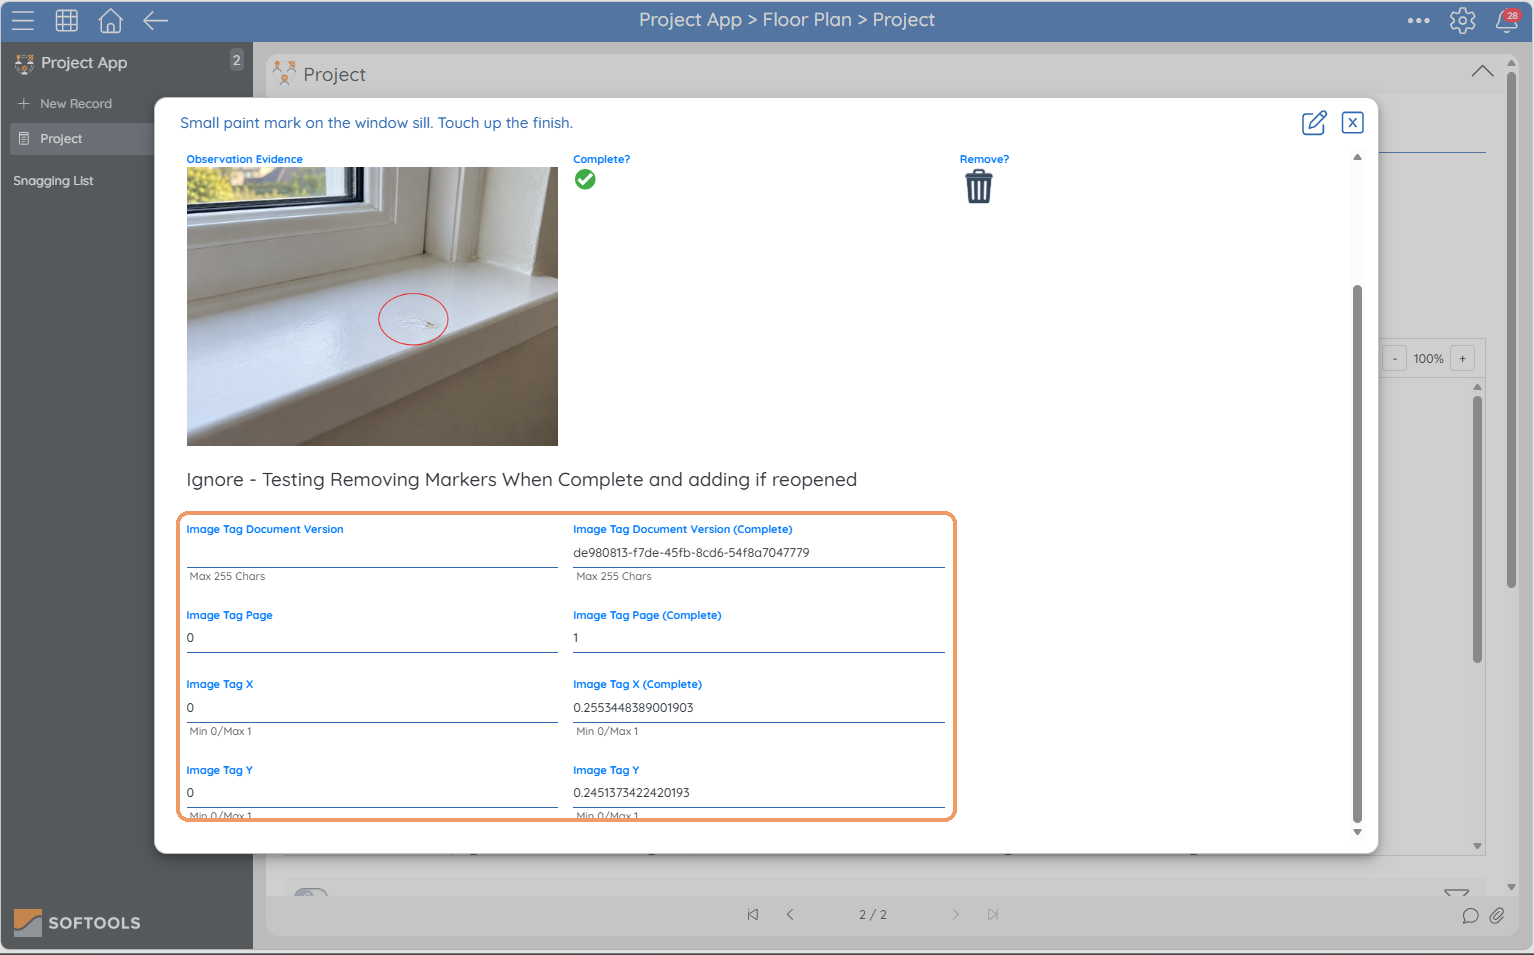
After reopening, the original values return to the live fields and the backups are cleared. The marker can appear again when the PDF-version conditions allow it.
6. Archive unwanted items and restore them when needed
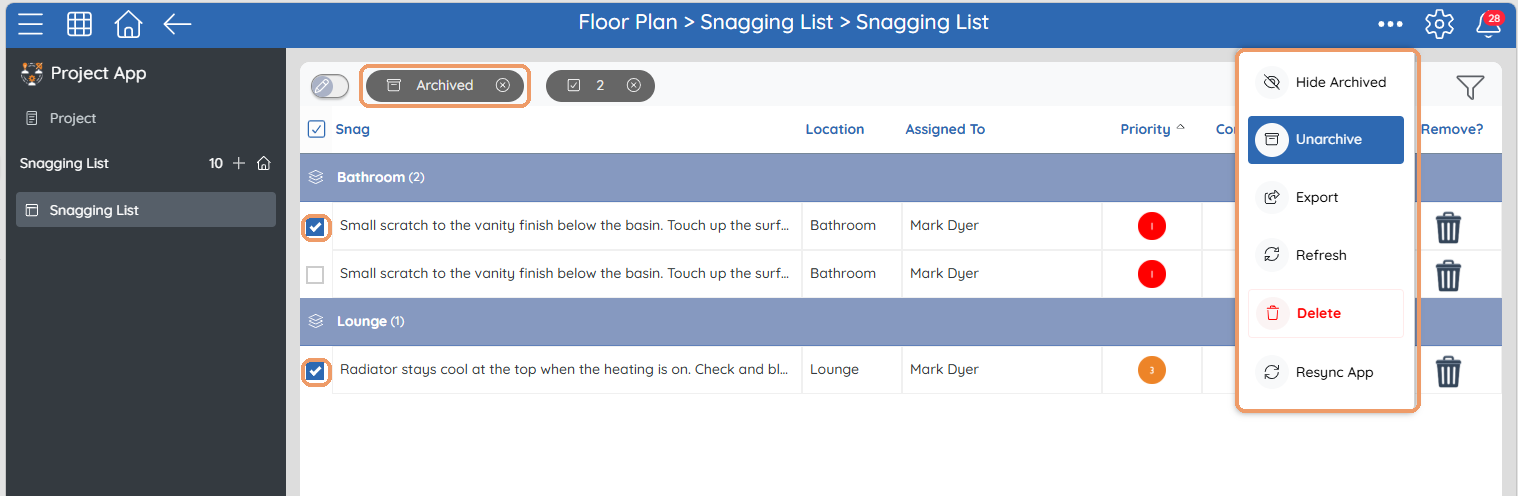
The Remove? action archives a snag from its pop-up or report row. Its marker and active report row disappear automatically. Use Show Archived in the child app to recover it.
Build it
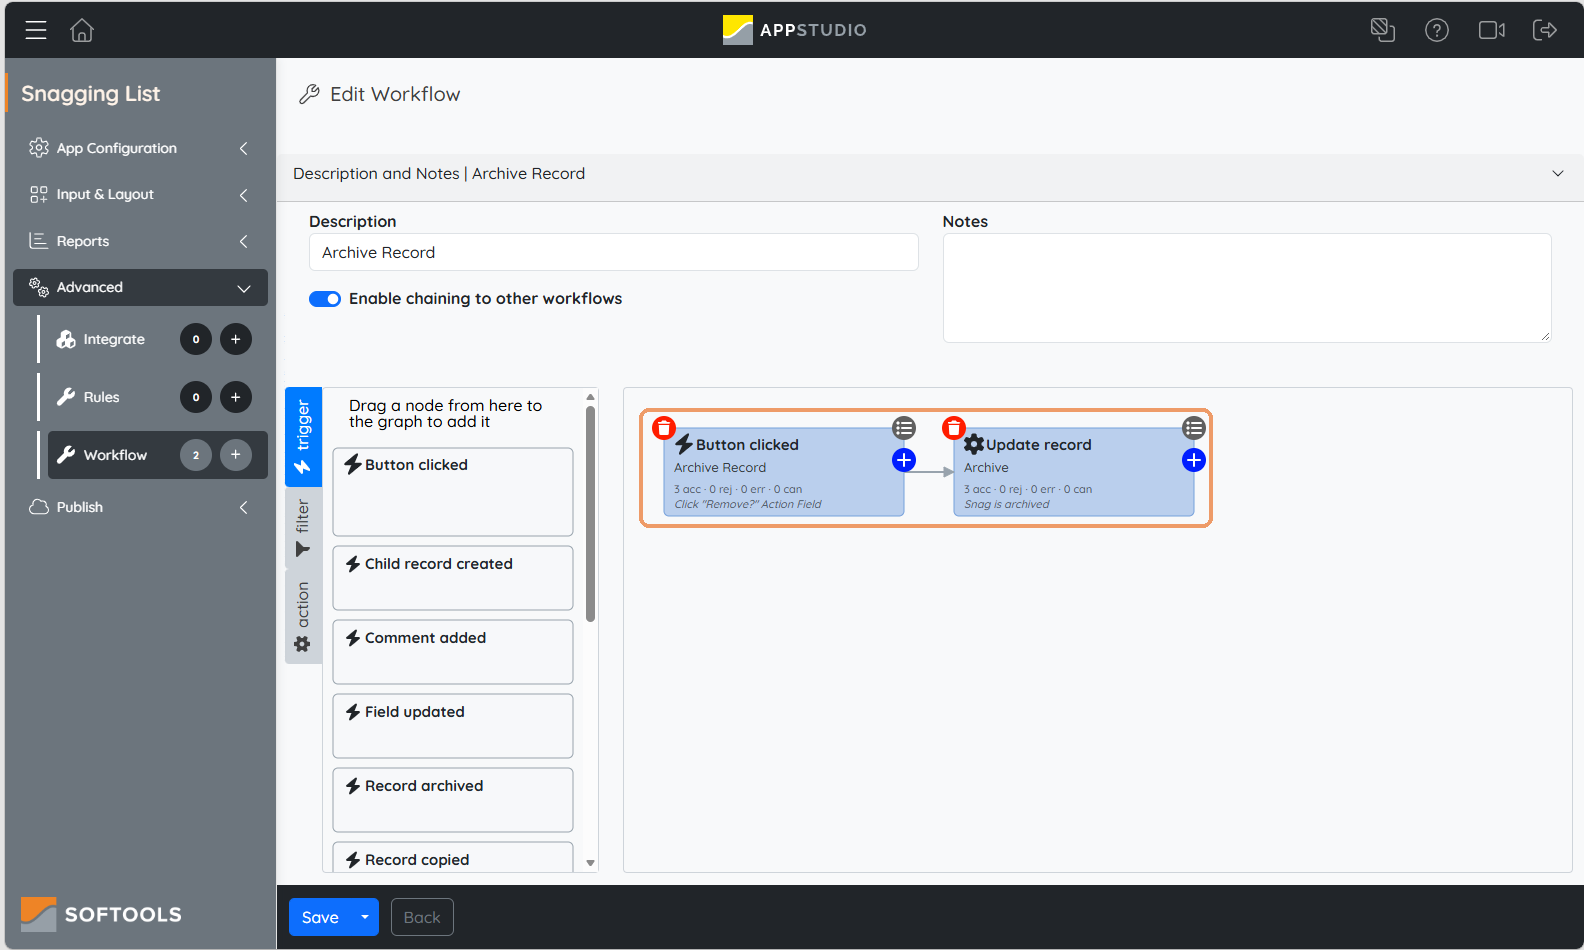
Configure a child workflow with a Button clicked trigger for the Remove? Action field, followed by Update record with Archive. Put Remove? on the open template and in the embedded report so users can archive unwanted items from either place.
Reduce accidental archiving with a confirmation message
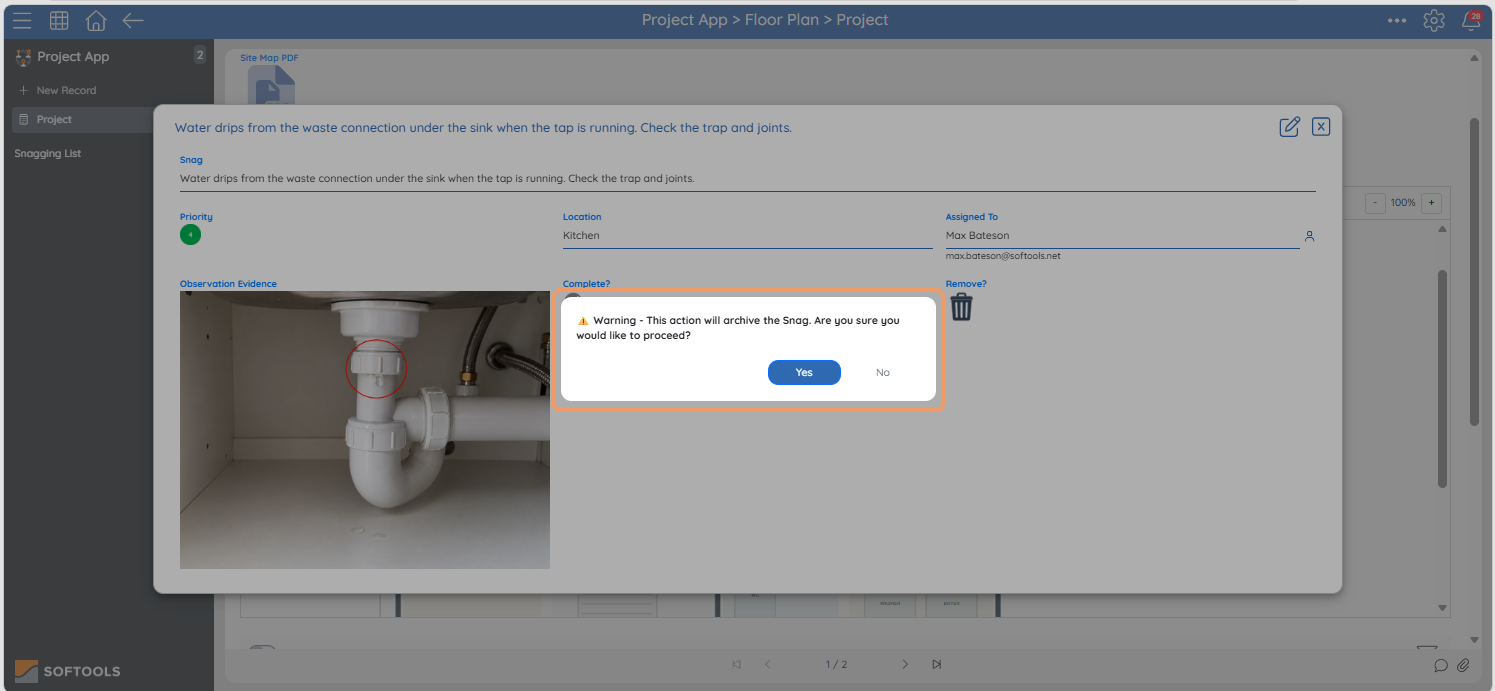
Edit the Remove? Action field and set its Confirm Message. For this archive workflow, use wording such as:
Archive this snag? It will be removed from the active list and floor plan. You can restore it from Show Archived.
Clicking Remove? then asks the user to confirm before the workflow runs. Yes proceeds with archiving; No leaves the snag active.
The archived record leaves the active report and the viewer. To recover it, open the child app, choose Show Archived, select the record and choose Unarchive. The record menu also provides Unarchive. A restored record can show its marker again when its marker fields and document-version conditions permit it.
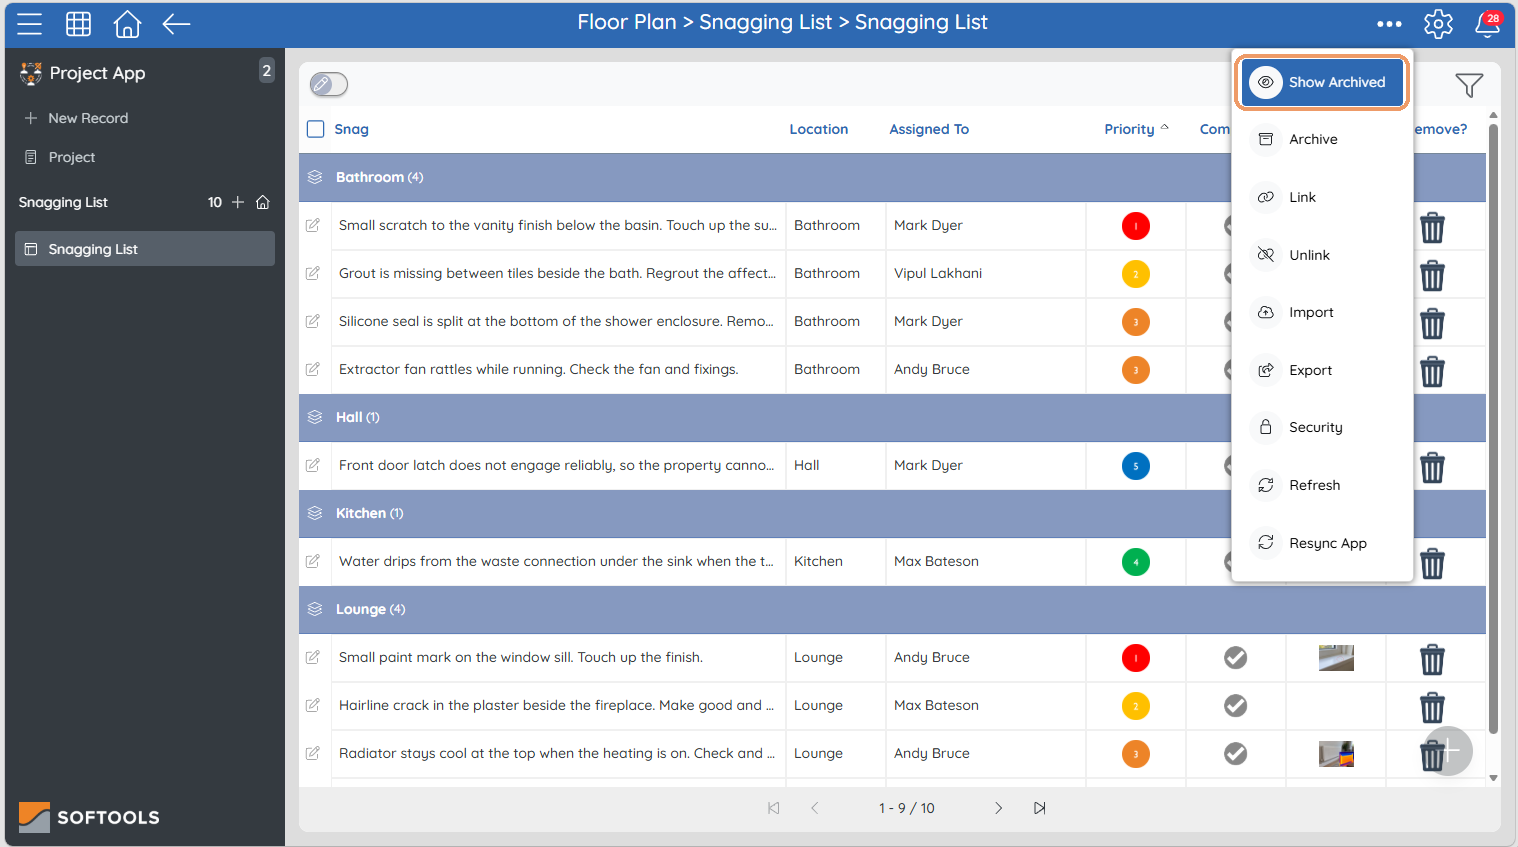
Select the archived records and choose Unarchive to restore them.
7. Choose what happens when the plan changes
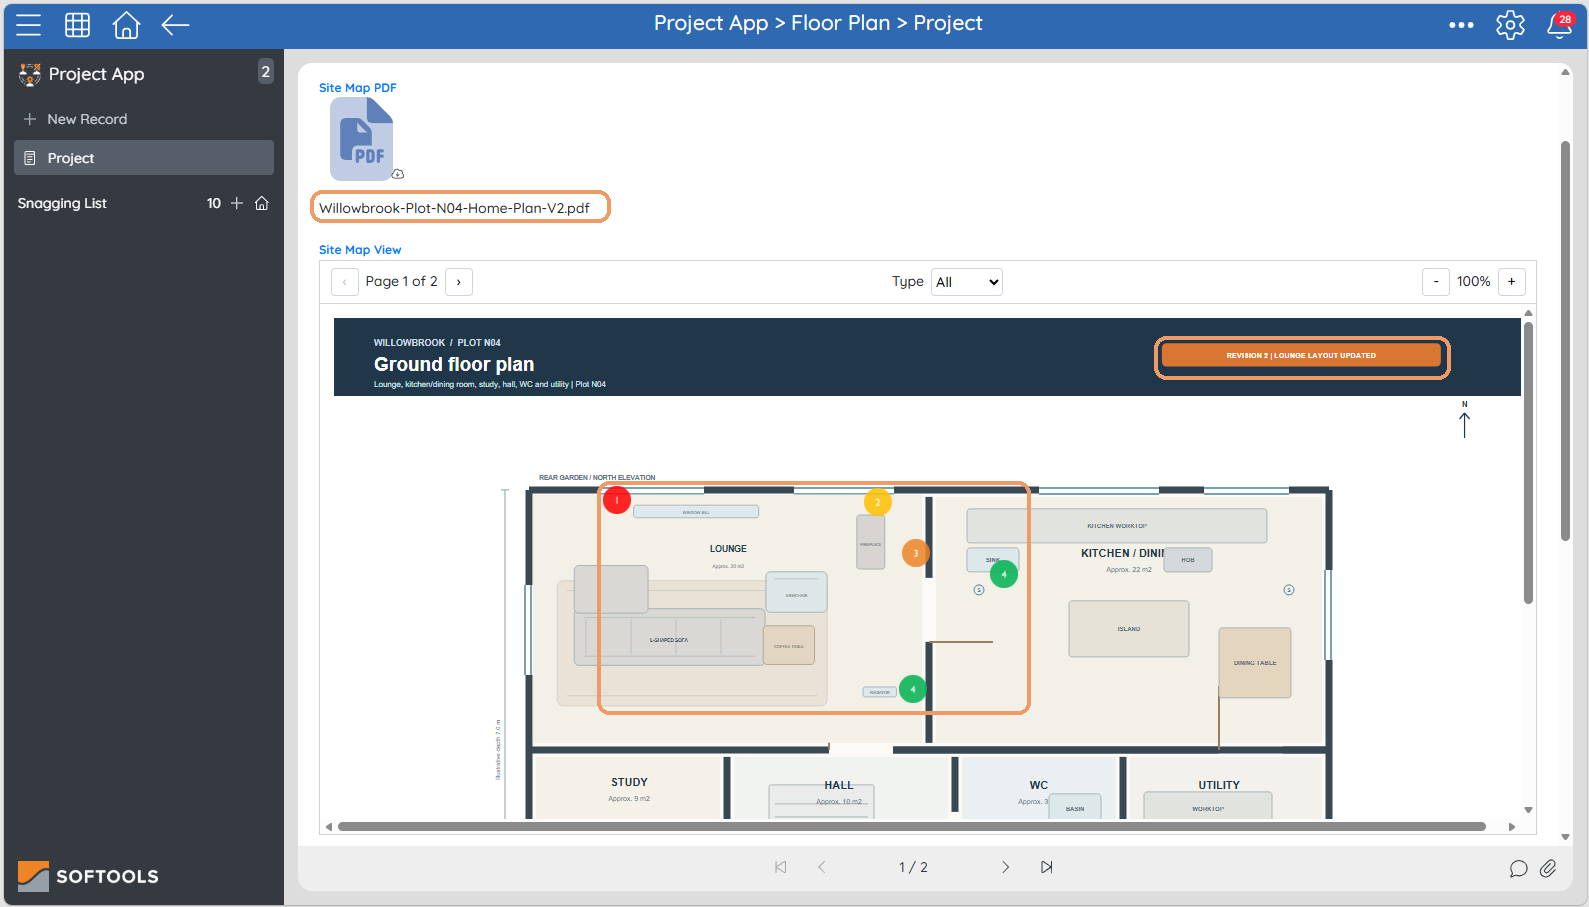
The Willowbrook V2 plan changes the lounge furniture. With Hide stale markers when the backing PDF changes switched off, the previous markers remain at their stored page and coordinates. This suits revisions where those positions still make sense.
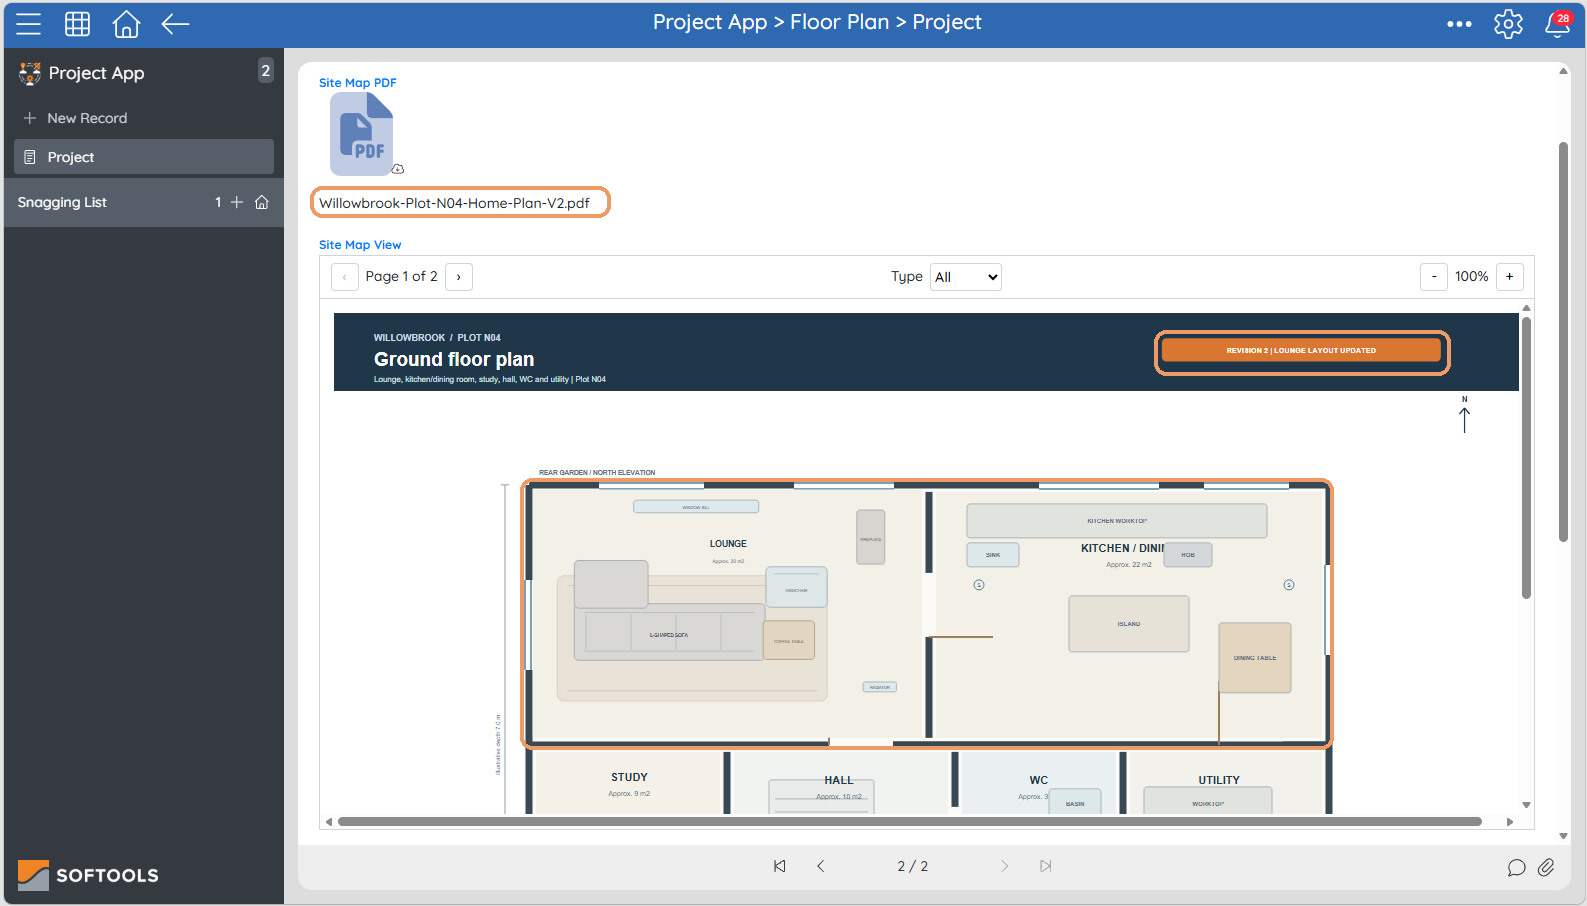
Switch the option on when markers should only be shown on the PDF version against which they were placed. The viewer compares each marker’s stored document version with the current PDF and hides mismatches. Turning it on after uploading the replacement PDF still hides those older markers. Their child records are retained.
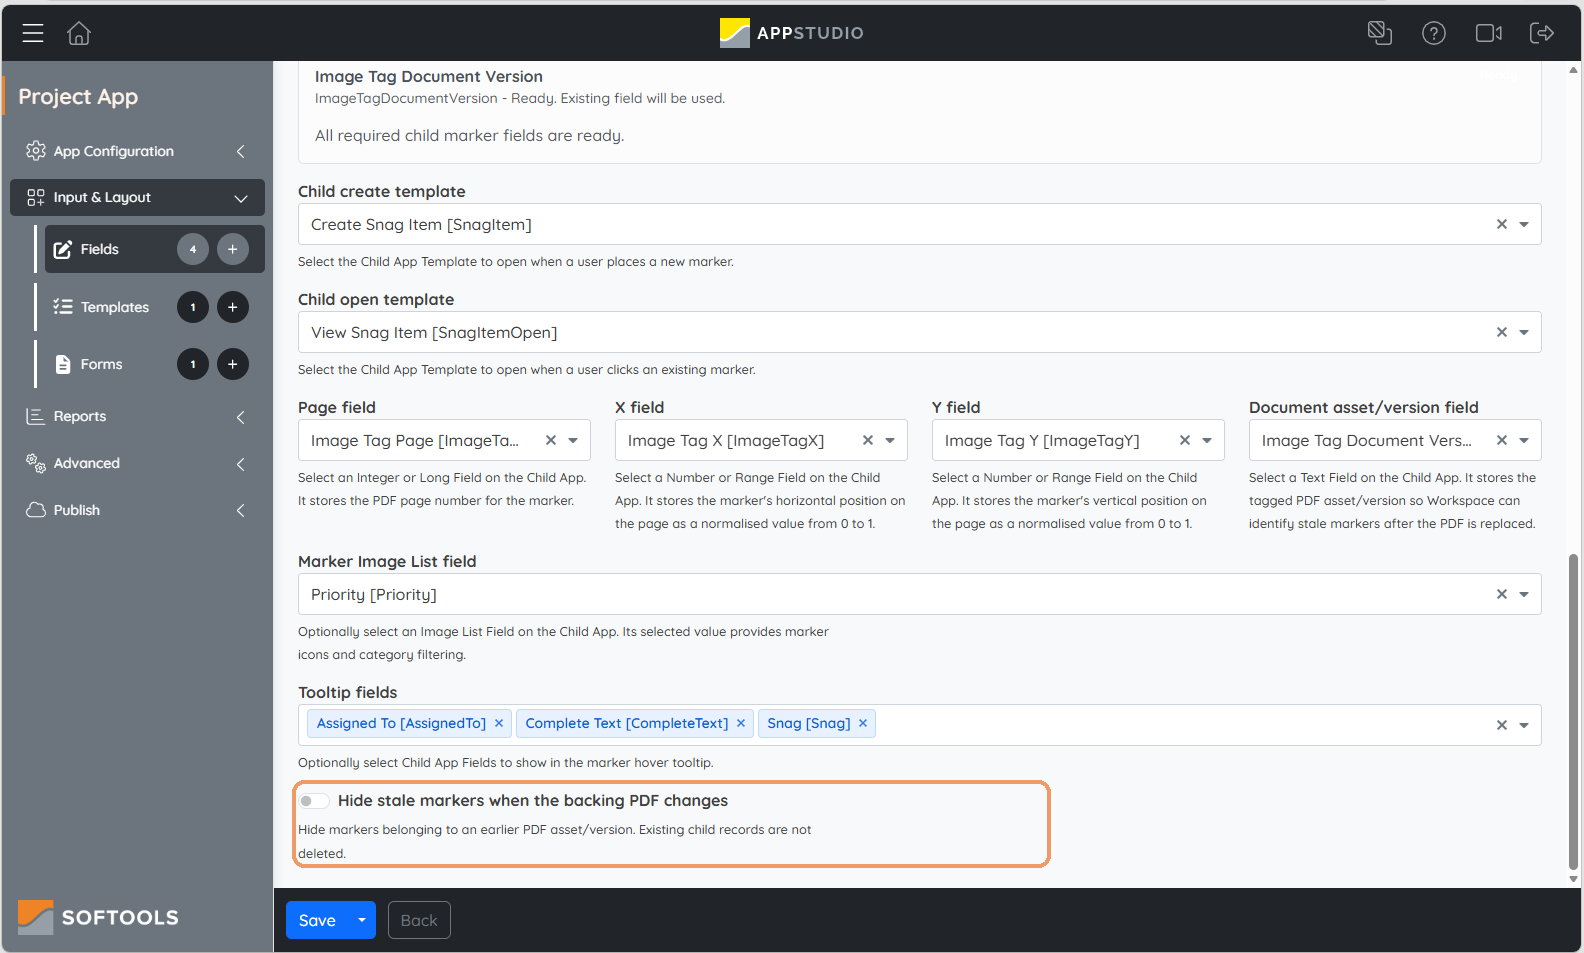
Set the required behaviour using Hide stale markers when the backing PDF changes in the viewer configuration.
Publish the solution
App Studio changes are staged until published. Publish both apps after configuring their respective fields, templates, reports, integrations and workflows.
In Workspace, follow the complete journey: place a marker, open it, filter by Type, complete and reopen the snag, archive and restore it, and replace the PDF with each version setting.
Adapt the idea to other PDFs
A contract or policy PDF can use markers to identify clauses, obligations, renewal dates or requirements. Each marker can open a linked review record containing notes, an owner and status. An Image List can distinguish categories such as key terms, questions and actions, while the embedded report provides a list of all marked items for that document.
This gives the document’s important points a location and a record people can work with. The same template, tooltip, workflow and version controls can be adapted to that review process.
For the field reference and full configuration details, see Document Viewer.
Please sign in to leave a comment.
Comments
0 comments