
When opening each App, you will be presented with the default Report. This is typically a list of the Records for that app. When you exit each app the system will remember the last report or chart that you were viewing, so you can pick up right where you left off. You can also use the filter icon ![]() to personalise your reports by adding default grouping, sorting and filtering for you and your teams.
to personalise your reports by adding default grouping, sorting and filtering for you and your teams.
Note that the records and information you see in your report may differ from your colleagues. This will be due to security levels for the Records which determine what you can see.
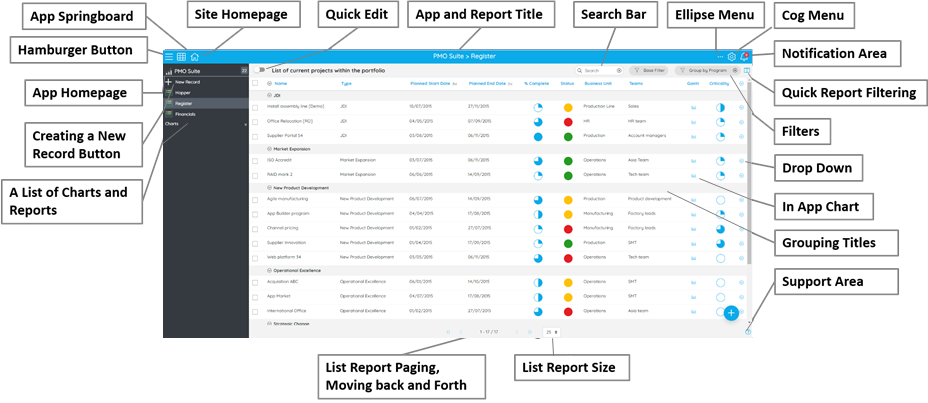
- Left Pane Menu: Click on the hamburger icon
 to access the left-hand menu. This will present a list of the pre-defined Reports that are available to you. If you need another Report then ask your System Administrators. The different icon used for Reports reflects the different types of Report or chart. These are often referred to as ‘views’ of the data. It will also show an option for you to go back to the app homepage of creating a record
 - Feature Menu: Click on the ellipsis icon
 to access the screen menu. The options you will see will be dependent on the permissions you have been granted by your System Administrator.
The Report Features Menu offers the following standard options:
- Archive: Click here to archive your Records so that they will not appear in the Reports. Note that you will need a separate permission to Delete records permanently. More information here.
- Export: Click here to export the records in .csv format for use in other systems or for working of-line. Read how to share a record here. Choose whether to export only the fields displayed in the report (this is typically quicker) or all records. Note that you will have an option to export to csv (used for working off-line before re-importing or for exporting to other systems) or to an MS Word template (used for sharing outputs with non-system users). Click here for more information about how to export the data from a report.
- Filter: Click here to set preferences for views of the data in a Report. Once set, preferences can be saved for use on a personal basis, across the team or across the business. Discover more on filtering here.
- Import: Click here to import data from a .csv formatted spreadsheet. Note that for this to work, the column headers must reflect valid field names in the App. The best way to ensure this is correct is to Export a record first and then use this structure as the basis of the import. When importing, if the Record ID is displayed in the first column it will update the record, and if not it will create a new record. Click here for more information about how to import records.
- Quick Edit: Click here to update multiple records quickly without the need to open edit and save. Records individually. This is a great feature for use in meetings where as the facilitator you may want to update Records in real-time. Read our article about Quick Edit here.
- Resync: Click here to refresh the Report to show any changes that may have taken place by other users, or by Workflow actions that are executed as background tasks. This will ensure that you are working on the latest data. More information about how to use it here.
- Security: Click here to set or change the security associated with the selected records. Note that the default security is set up by the System Administrator, but can be overwritten by the user to allow access on a Read Only or Read Write basis. Click here for more information about security.
- Show Archived: Click here to show the records that have been archived, and you will be able to unarchive the Records if needed.

The Floating Menu bar appears in the bottom right corner of the pane and offers the following functionality:
- Support: If you need help then there is extensive documentation available in our help centre. This can be accessed via the '?' icon. Enter the action that you would like help with and we will recommend articles to support you. If you cannot find the article that you need then you can create a support ticket from here which will be tracked by our support agents.
- Help: You can click on the 'i' icon to view app specific help. This contains a description of what benefit the application provides. It also indicates who the Subject Matter Expert (SME) is with contact information to request advice. There can also be app level support materials added in the form of URL links, images, instructional videos that have been added via AppStudio and downloadable files. More information here.
- Background Activity: The green activity rectangle shows the background activity which has occurred on this App since the report was shown. It gives the option to refresh the report in order to show these changes to records. The updates may or may not have affected this particular view o records, depending on the filters applied and the columns shown, so is simply an indication that records have changed since this view was given
Comments
0 comments
Please sign in to leave a comment.