
This functionality is often used when managing large sets of Users. It allows you to edit multiple users, Profiles, Permissions and Teams in one go without the need to do each one manually. It also allows you to add a large group of Users across multiple teams with granular permissions.
Click on the launchpad in the top left and then the COG to access the Settings area.

Select the 'User Settings' App and In the left pane menu to bring up the list of Users that have access to the site. Exporting the data first will give you a template that you can use to add new users. If you already have a User import Template then skip to 'Adding new users via .csv Import'.
Exporting Current Users
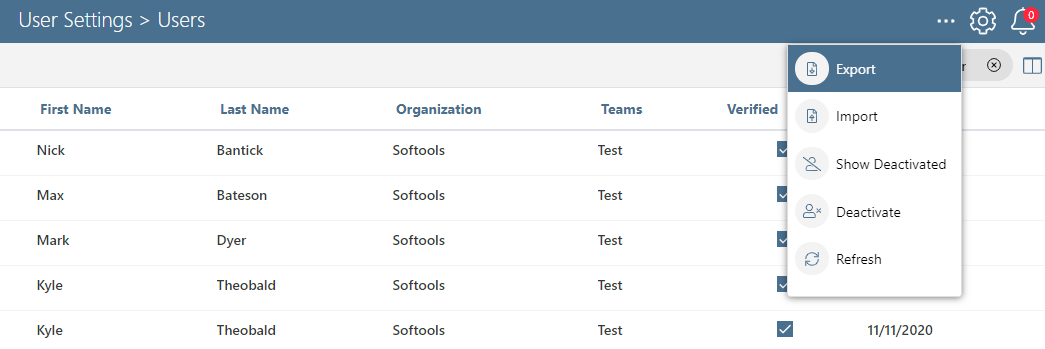
Exporting will give a list of the current users on the system. First select the users that you would like to export or click the toggle box next to Username at the top of the Report to select all users. Then click on the ellipses in the top right of the screen '...' and select Export.
This will begin the Export, you can keep track of the export via the notifications bell in the top right corner of the screen. Once your export has completed you will be able to download it from the same notification bell via the 'Click to Download' link. If you have desktop notifications enabled you can also click the link that appears in the completion notification.
NOTE: A refresh of the page may be required in order for the export job to show as completed (green).
Viewing and Editing Existing Users in the .csv
Opening the .csv file will show you a view of your users where the user properties appear as column headings and then each Row represents one User.

The Export will contain a number of different user properties. Some of these are for reference and some can be edited. In order for the row with the user account to be edited on import of the file it must contain the user GUID in the [ID] column when the file is ready for import.
[ID]: This is the unique system GUID for the user account and cannot be changed. If there is a value in this column that matches an existing user then when the file is imported it will find the existing account and update any changed information in other columns.
Username: The Username must be unique as this will be used to log in to the site. It must contain only lowercase letters and numbers, starting with a letter and also be at least three characters long. Once set the username cannot be changed.
FirstName & Last Name: The first and last name on the account will be used when the Account appears in Person selection Fields and will also be used to personalise the experience for the user. Each name must be a minimum of two characters. The text for First and Last name can be updated.
Email: Each account will need a unique email account assigned to their account. This will be used to send a verification email for the account and will also be used to send any emails generated by the platform including notifications of exports or email workflow alerts sent out when Records require attention. The email can be changed in the .csv file but will require the user to confirm this change by entering their password in a change email verification email sent to the user on import before the account will be updated with the new value.
TeamNames: Team membership can be updated via import. This allows users to be added or remove from a team or multiple teams. Enter the team name you would like the user added to or for multiple teams separate team names with a comma. The change will overwrite existing Teams, not add in addition to current team membership. Note: If teams have been created on the site then it is necessary for the user to be a member of at least one.
Permissions: Permissions determine the actions that the User will be able to perform such as adding new records, updating the site settings or making changes to applications. The appropriate permissions for the user can be assigned here. These are by referencing the permission code in an array of the form [{"Code":1001}, {"Code":1002},…, {"Code":3001}] where each code is an individual permission. A full list of these permissions can be found here in User Permission Codes explained. We would usually recommend copying and pasting from another User in the file with the same permissions that you would like to have.
IsAccountClosed & IsAccountVerified: These two properties are for reference to see the current status of the account. If the account is closed then the account has been deactivated by an administrator. If the Account is not verified then the account has been created but still requires activation by the user verifying via a link in a system email sent to their account on creation. These cannot be updated via import.
Language: By setting a language it will mean the user sees all labels and features throughout the site in their native language. This will require the country code in order to set the language.
Organization, Department, Location, JobTitle and Notes: These fields can be updated in the .csv file. They are fields that accept any text and can be used to classify groups of users. These properties will not change the users experience or access but will be useful as they can be used by administrators to search for users in the settings area.
LastLogin & LastAccess: These two are dates that are used for reference but cannot be updated on the .csv. The last LastLogin date is the last time that the user enters their login information and signs into the site. If the user keeps their session open or uses remember me on their account then the LastAccess will give a better indication of when they last used the site.
Adding new Users to the .csv
New Users can be added to the .csv by adding them as a new line with no value placed in the ID. The minimum Fields required to add a new user are Username, Email, FirstName, LastName and TeamNames if there are Teams on your site.

Importing the updated .csv file
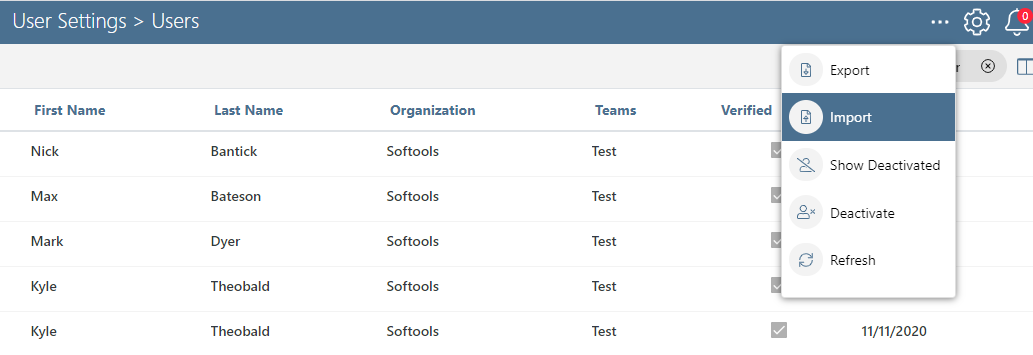
Once you are happy with the changes to user accounts and have added new rows for any new users to the system you can import the file to action these. From the screen with the list of users, click on the feature menu in the top right of the screen '...' and select Import.
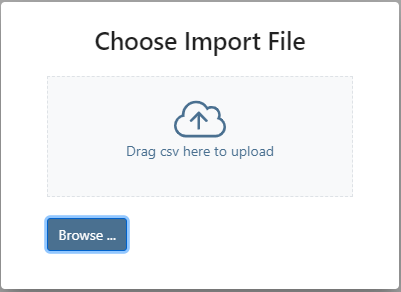
This will open a pane where you will be able to select the .csv file for import. Either drag and drop a file from a document folder into the drag and drop box or there is the option to 'choose file' which will open you browser file explorer where you can select the correct .csv. This will start the import process and you will be notified of progress via the notification bell and if you have desktop notifications enabled by those as well.
To check the progress of an import you can use the Import Summaries area. In settings select the 'Import Summaries' App and it will show you key information such as number of added and updated accounts, as well as identify if there were any errors for a row that prevented an add or update. Look at our article on Import Summaries for more information.
Comments
0 comments
Please sign in to leave a comment.